
 Home
Home Submit a Request
 Check on a Request
 Knowledge Books
 Getting Started
Home → Users Manual → Printer Friendly Version
Users Manual
- 1. Welcome
- 2. The Workspace
- 3. Workspace: Left Navigation
- 4. Workspace: Request Grid
- 5. Workspace: Top Navigation
- 6. Filters
- 6.1. Filters Overview
- 6.2. System Filters
- 6.3. Creating a Filter
- 6.4. Creating a Filter - Options Tab
- 6.5. Deleting a Filter
- 6.6. How Filter Conditions Work
- 6.7. Filter Conditions Reference
- 6.8. Sub-Condition Groups
- 6.9. The Filter Options Dropdown Menu
- 6.10. Filter Display Columns
- 6.11. Filter Display Columns Glossary & Definitions
- 6.12. Exporting Filter Results to CSV
- 6.13. Sharing Filters and Permissions
- 6.14. Filter Best Practices
- 6.15. Filter Views: Grid and Stream
- 6.16. Filter Keyboard Shortcuts
- 6.17. Filter Caching and Performance
- 6.18. Why do filters not show all items?
- 6.19. Organizing Filters into Folders
- 6.20. Filter RSS Feeds
- 6.21. Example: Custom Team Inbox
- 6.22. Example: Escalation Dashboard
- 6.23. Example: Report on Tickets Opened or Worked On During a Month
- 6.24. Example: Monitoring a New Staff Member's Activity
- 6.25. Example: Monitoring SLA Response Times
- 6.26. Example: SLA Compliance Across Tiers
- 7. The Request Page
- 8. Responses
- 9. HelpSpot AI
- 10. Knowledge Books
- 11. Reports
- 12. Customer Portal
- Appendix: Feature In-Depths
1. Welcome
1.1. The Big Picture
If you're reading this manual you've realized that email folders, sticky notes, or even your current help desk tool are no longer the way to handle Customer inquiries. You're looking for an improved experience for Staff and Customers with more advanced capabilities to manage your support operation...Welcome to HelpSpot!
HelpSpot's core function can be summed up as:
"HelpSpot is a web-based application that empowers companies to effectively manage Customer inquiries."
To create a product that is optimized to support this core function, we kept a few guiding principles top-of-mind:
Accommodate many support channels
Customer inquiries come at you from every direction. HelpSpot accounts for this by supporting the channels you need:
- Email (your current support email account) HelpSpot is optimized for email-based exchanges,
- Web-form (using the portal),
- Phone/walk-up/fax/IM (via User creation), and
- API (covered in API Manual, linked)
Create structured flexibility
The needs of every company differ; some require elaborate issue categorization and meta-data collection capability, while others only loosely categorize issues. To accommodate all types of companies, we provide a structured framework of data collection/categorization that is fully customizable yet still easy to report against.
Require request ownership
Individual ownership is required in HelpSpot. Requests cannot be assigned to a nebulous workgroup or department. Individual ownership is the cornerstone of driving processing efficiency and ultimately Customer satisfaction.
Create a clear, concise, request history
Every request has a complete log of all actions taken and messages sent. This allows any User, at anytime, to become current with a request.
1.2. Targeted Audience and Common Terms
Targeted Audience
This manual is intended for all HelpSpot Users, those new to help desk software as well as those migrating from another product.
Administrator-specific settings and configuration options are not covered in-depth in this manual.
Common Terms
The following terms are used throughout this guide:
- User - Anyone with a HelpSpot account.
- Staff - Generically refers to any help desk staff member.
- Staff level - User with Help Desk Staff level permission to HelpSpot.
- Administrator - User with Administrator level of access to HelpSpot.
- Editors - Users with capability to create knowledge book content.
- Moderators - Users with ability to manage interactions in forums.
- Customer - Refers to a support desk's Customers (internal or external): the individuals submitting requests.
- Request - The Customer inquiry in HelpSpot.
- Installation - The instance of HelpSpot used by a company.
1.3. Default Levels and Permissions Groups
A Users permissions settings and/or level dictates access to features. Permissions are set by Administrators, typically at time of Staff account creation. Staff can be assigned one permission group. The permission group is not related to any individual request or set of requests. Instead, permission groups control access to various actions and areas inside of HelpSpot.
Default Permission Groups
When HelpSpot is initially setup a default set of permission groups are created. In addition there is always an Administrator permission group. The Administrator permission group is a super user level that allows unlimited access to the system. The Administrator group cannot be removed or modified.
Modifying Permission Group
The permissions settings for any of the default permission groups can be modified, through the permissions group management area in the Administration section of the site (accessible by Administrator level only).
Creating New User Levels (Permission Groups)
Administrators can use the Permission Groups area to create a new permissions group. New Groups can be cloned from existing User levels for ease of creation.
1.4. Getting Up and Running-Administrators
While this guide doesn't specifically cover Administrator configuration, the following provides Administrators with a quick look at the most important steps for getting the installation up and running. More detailed Information on configuration can be found in the HelpSpot Administrator Manual.
- Configure System Settings Page
(Location: Admin>Settings) The settings page includes several system-wide configuration options that range from creating status types to defining the layout of the Customer portal. Administrators should review and become familiar with each as an initial step in the set-up process.
Status types are most useful for defining the resolution for each request.
- Create Support Staff Accounts
(Location: Admin>Staff) User accounts must be created and assigned access to the system. The following provides a high-level look at each permission level.
- Create Request Categories
(Location: Admin>Categories) To effectively route requests and allow for concise request reporting, Administrators will need to define request categories. Permissions for default ownership, accessibility by assigned Staff, and visibility on Customer portal must also be set for each category created. Reporting tags for each category are an optional way that further classifies individual requests.
- Create Support Mailboxes
(Location: Admin>Email Mailboxes) HelpSpot mailboxes serve as a way to seamlessly integrate email exchanges. By adding individual mailboxes, HelpSpot can pull all messages sent to existing support email account and create new requests or append notes to existing requests. Through additional configuration, Administrators can opt to route requests resulting from emails into specific categories or auto-assign to selected Staff.
- Define Custom Request Fields
(Location: Admin>Custom Fields) Custom fields are a means to create User-defined fields for the collection of meta data. With 11 different types available Administrators have a robust, structured framework for collecting the information specific to their product/service or organization.
1.5. Logging in
When an account is created, the User receives via email his/her account login information. Upon login Users are brought to the workspace which is where our guide begins.
2. The Workspace
2.1. Getting the Lay of the Land
The workspace, or the initial landing page, can be thought of as the hub of all request management within HelpSpot. It is from here that Users can access individual request management functions: creating, viewing, and updating. This chapter looks at the basic structure, layout, and function of each of the areas within the workspace.
For the purposes of understanding the overall structure, let's break the workspace out into three areas. These areas are briefly introduced below and covered in-depth in subsequent chapters.
- Left Navigation. This area includes all of the links running along the left side of the screen. These links provide access to varying request views and related actions.
- Request Grid. Conceptually, the request grid is the display area for requests meeting specified criteria. Criteria will vary depending on the filtered view the User is in. The criteria used to determine the requests displayed in the request grid (for any given filtered view) are defined by:
- Users or Administrators; through filter creation,
- System default views: the Inbox and My Queue.
- Top Navigation. This encompasses both the very top navigation items as well as those just below the navigation bar.
3. Workspace: Left Navigation
3.1. Inbox & My Queue
Inbox
On a very broad level the Inbox is home to all unassigned requests. As such, its primary function is to serve as the entry point for new requests (submitted via email, portal or other channel).
Users can take a request from the Inbox by simply clicking on the Take It button to the far left within the request grid. Upon doing so, Users will immediately be taken to the request page for that request. Ownership begins as soon as a User takes a request out of the Inbox; it is no longer shown in the Inbox and will instead show in that User's My Queue.
My Queue
As mentioned in the previous section, once a request is assigned to a User it is no longer available through the Inbox and can be found in the User's My Queue.
Request assignment can occur in several ways: User takes a request from Inbox, one User assigns a request to another User, or an automated process handles the request.
Once a User clicks My Queue, the request grid in the center of the screen will load all the open requests assigned to that User.
The list of requests shown here will vary between Users because it reflects the requests assigned to the person logged-in. Additional views, or filters, can be created and saved for viewing requests assigned to others.
HelpSpot uses My Queue as the default view when Users login and click the Workspace tab. However, this is customizable, allowing Users to select any filtered view as the default.
3.2. Search
HelpSpot provides users with a several different ways to find requests within the system.
Quick Search
Quick search is located in the left hand navigation bar. If a request id is entered, the user will be taken directly to that request. Otherwise, a full text search is performed. Full text search modifiers can be used in this box.
Advanced Search
Advanced searches can be done on a myriad of customer, request, and installation-level details. You can access the advanced search tool in the top menu bar.
Customer Searches
Users can search against any/all customer specific information found on the request page. Results are returned below the search boxes and clicking the linked request ID will allow Users to go directly to the request page for the individual request.
Detailed Searches
This search type allows Users to create a more intricate, specific set of search criteria. At a high level, the parameters by which Users can search are grouped by the following:
- customer information
- request details
- custom fields
- request history
- date & time (minutes/hours since or before specified actions)
- assignment chain (who/when of request ownership)
- public updates (by whom and number of)
- any/all conditions and custom SQL
Turning Searches into Filters
Users need to go into the filtered view to modify filter (such as making Global or modifying columns). Once in the filtered view, select the edit filter link in the options menu to make the necessary changes. For more on managing filters, see the filters page.
Full Text Search
Full text searches allow users to search either Requests or Knowledge Books, and sort via relevance or chronology:
Advanced syntax can be used to narrow or broaden search criteria:
Syntax
- Use + for must contain: +printer, +password
- Use - for must not contain: -printer, -password
- Use " " for a phrase: "lost my password"
- Use * as a wildcard: print*
Examples
Search must contain "password" and "reset" but not contain "windows":
+password +reset -windows
Search must contain the phrase "Budget Report" and the word December:
+"Budget Report" +December
Search can contain either Password or Login
Password Login
3.3. SPAM & Trash
SPAM (overt advertising, typically created via an automated process) is a common problem for support centers that openly publish support email addresses or web-forms. To prevent it from interfering with true Customer inquiries or incorrectly skewing reporting, HelpSpot has integrated a trainable SPAM tool.
Training the SPAM Tool
HelpSpot will initially depend on Users to flag requests that are SPAM. Over time, while this flagging is being done, HelpSpot will learn to recognize the SPAM specific to the installation and automatically flag it accordingly.
Users can flag requests as SPAM in the request grid (using the quick action buttons), from the request preview (as of HelpSpot 5.8.4), or in the request itself.
All requests flagged as SPAM are available via the SPAM link in the left navigation. From here, Users can use the request grid to click into the request or select and delete it.
Messages which are sent to SPAM but later marked as NOT SPAM by a User also helps train the SPAM tool to not incorrectly mark requests as SPAM.
Removing Flag or Deleting SPAM
If either a User or the SPAM tool incorrectly flags a request as SPAM, check the box next to the request and use the drop-down at the bottom of the request grid to select Mark as Not SPAM. After hitting submit the request will move into the Inbox where it can be taken by any User. Marking a request as NOT SPAM will train the SPAM tool to not mark notes from that sender as SPAM.
SPAM must be deleted to reinforce the systems learning process. To delete, check the box next to each request and use button at the bottom of the request grid to delete the SPAM. Once this is done it will be completely removed from HelpSpot.
Trash
Requests that aren't necessarily SPAM but don't need to be worked or counted towards reporting can be flagged for the Trash. Using the Trash is a means for handling email bounces, training/test requests, and duplicate requests. Requests can be moved to the Trash from the quick action buttons, from the request preview, or from the request page.
3.4. Viewing Filters
Filters are custom-created views of requests. Each filter has a set of criteria, defined by the creator using specific conditions that requests must meet to be returned in the results set. Filtered views can be created and saved on the User or global level.
At the bottom of the left nav, Users will see a list of both personal and global filters. Personal folders can be listed individually on the left nav or grouped into folders. To access the contents of a filter, click the filter name.
Modifying Filter Views
To modify the properties of a filtered view, simply click the edit link in request grid view.
For more on the specifics of Filter modification, see the Filters page of the manual.
4. Workspace: Request Grid
4.1. General Layout
The request grid is the display area for requests meeting specified criteria. The criteria will vary depending on the filtered view (Inbox, My Queue, or custom-filtered view) the user is in.
At the top of every request grid is the name of the view. For those views that are system created, it will be the names designated by HelpSpot; Inbox and My Queue. For those views created by Administrators or Users, via filters, it will be the name designated during filter creation. Just after the view name, Users will find a request count. This count reflects the number of requests that match the defined conditions.
To the far right of the name and count the filter menu allows access to other filter functions.
- Edit. If the current user is the filter owner or an admin they can edit the filter criteria.
- Stream: Users can go between the request grid and the note stream layouts. These views are described more in-depth below.
- Options: Within the options menu, Users have access to delete filter or make the filtered view the default workspace. Every filtered view can be exported into a .csv file or viewed via an RSS reader.
Request Grid: Default Columns
The request grid returns specific information, in columns, for each request that is included in the results set for the view. The Inbox and My Queue have a default set of columns that are returned. Those columns returned in custom-created filtered views are defined by upon creation. Working left to right in the request grid, the default columns are outlined below.
- Quick Action check box. The check box to the far right of all requests is used to select the request(s) for which one of the quick actions will be taken. A complete list of quick actions available is discussed later in this chapter.
- Take It (Inbox or custom filtered view only). Allows Users to take a request to work. Once clicked, Users will be brought to the request page. At this point the request is assigned and will no longer be visible in the Inbox.
- Read/Reply Indicator. A graphical indicator of the most recent action taken on the request.
|
Green dot. The most recent update to the request that is unread by the assigned User. |
|
|
Grey dot. User has read the update but a Staff member has yet to reply. |
|
|
Circular Arrow. Staff member was the last to reply. |
Users can click the green/grey dot to change the read/unread state.
- Request ID. This is the ID auto-assigned to each request when it enters the system. Within the Inbox, there is no request ID but rather the Take It button.
- Customer Name. First and last are shown, if provided.
- Initial Request. Shows the first few sentences of the initial request sent by the Customer. The text can be clicked to preview the body of the message.
- Age. Shows the length of time that has passed since the initial request was created.
Note Stream View
By default, HelpSpot loads each filtered view a grid-type layout (as outlined above). However, on the fly, Users can switch to the note stream view that shows only the real-time activity of requests. Users can specify if they want to see the following update types:
- Staff only (public updates)
- Staff only w/private
- Customer only
- Customer & Staff
Users can think of this view as a timeline of request activity within the filtered view.
Simply clicking the grid-like icon will return Users to the standard, request grid view.
4.2. Quick Actions Buttons
The quick action buttons allow users to perform actions on request(s) directly from the request grid page, saving the need to enter the request page for each individual request. Quick action buttons can be found at the bottom of the request grid in all filtered views.
All actions are performed by selecting the checkbox next to the desired request(s), then click the desired action button.
Available quick actions include:
- Reassign. Users can opt to assign a new category and Staffer to the selected requests. When used in conjunction with category auto-assignment (if enabled), it can serve as a means to manage workflow based on issue types.
- Close. When a group of requests does not require further action they can be closed directly from the request grid. Prior to action being completed, Users must select the appropriate closing status types.
- Batch Respond. This action allows Users, in one step, to update multiple requests.
- Merge. Allows for the request history of one, or more requests, to be forced into another.
- Status. Users can quickly change the status for a group of requests.
- Trash. A means to remove testing/training requests, duplicate requests, or any other requests that do not require action or should be removed from the system for reporting purposes.
- SPAM. Will flag all selected requests as SPAM and move to the SPAM filtered view for deletion.
4.3. Previewing a Request from the Grid
Clicking the request text in any request grid (the Inbox, My Queue, or a filter) opens a preview of that request in a modal window, without leaving the grid. The preview shows the full request history, the customer details, and the request's current category, status and assignment, so you can decide what to do with a request before you open it.
What's in the preview
The top bar of the preview shows the request ID, linked to the full request page. If the request is unassigned, a Take It button appears beside it, which assigns the request to you and opens it.
Below the top bar is the request itself: the customer's details, the request details, and every history item in the same layout as the request page.
Spam and Trash quick actions
As of HelpSpot 5.8.4, the preview's top bar also includes two quick actions next to the request ID:
- Spam (the ban icon) — flags the request as SPAM and moves it to the SPAM view. This also trains the SPAM filter, as described in SPAM & Trash.
- Trash (the trash-can icon) — moves the request to the Trash. Use this for bounces, test requests, duplicates, and anything else that should not be worked or counted in reporting.
These are the same actions available from the quick action buttons at the bottom of the grid; the difference is that you can act on a request while you are looking at it, rather than closing the preview, finding the row, and ticking its checkbox.
After you mark a request as Spam or Trash from the preview, the row is removed from the grid behind it and the preview advances to the next request in the list, so you can work through a queue of suspect requests one after another. When you act on the last request in the list, the preview closes.
Permissions
The Spam action only appears for users whose permission group has Manage SPAM (mark as and delete) enabled, and the Trash action only appears with Manage Trash (mark as and delete). Users without these permissions still see the preview, just without the corresponding buttons. Permissions are set by Administrators in Admin > Groups; see Permission Groups.
4.4. Display Options and Editing
At the top of each filtered view, within the name header, Users will find various options for viewing/editing that view.
Request Grid View and Note Stream View
The details of these view are described more in-depth on the General Layout page, linked under related pages.
Options
For each filtered view, Users have a few options available to them. The Inbox and My Queue, because they are system default views, have a limited list of options available.
Customize Columns
Only available for Inbox and My Queue. Allows Users to configure those default items included in the request grid view.
Edit Filter
This only shows to the filtered view creator or an Administrator. From this link, the parameters of filtered views, permissions, and how they are displayed can be modified.
Make Default Workspace
Any filtered view can be made as a Users default landing page when entering the Workspace. When used in conjunction with a Take It button, any filtered view can be used as an organizations/work groups default inbox.
RSS and .CSV export. The contents of any filtered view can be exported to either an RSS reader or .csv supporting application.
5. Workspace: Top Navigation
5.1. Accessing Other Areas
Along the top, Users will find icons to access other areas of HelpSpot. Not all icons are available for all User levels.
Top navigation icons include:
| Workspace | The initial landing page, can be thought of as the hub of all request management within HelpSpot. |
| Knowledge | Allows an organization to create documentation for their products/services. |
| Reports | A comprehensive, customizable and graphical way to monitor the activity on your help desk. |
| Responses | Allows for the creation of response macros that can be used in requests in addition to scheduled requests. |
| Admin | The administrative area where HelpSpot is configured and business rules are created. |
| Access the advanced search tool | |
| Access customer facing portals | |
| Access personal staff settings and configuration options. |
5.2. Create a Request
The create request button, below the top navigation, is used to manually create requests. Requests would typically enter the system via email, portal form, or API. However, there is a means to create request for such customer encounters such as phone or IM.
Once a User clicks the create request button, the request page loads.
5.3. Subscriptions & Reminders Lists
Subscriptions
Users can follow changes made to requests that aren't assigned to them by opting to subscribe to a request. In any request that a user is not currently assigned, they can use the star icon next to the request id to subscribe to notifications on future updates.
As the assigned user of a request you can also subscribe another user to the request using the option in the staff notification area of the request.
Reminders
From the request page of an individual request, Users can set a reminder. Reminders are emailed at the designated date/time to selected Users and are listed under the reminders area of the workspace.
Managing Subscriptions and Reminders
Both subscriptions as reminders can be accessed for a given user by clicking on the user menu. Subscription and reminders can be removed from this screen.
6. Filters
6.1. Filters Overview
Filters are custom views of requests. Each filter is a set of conditions that decide which requests appear, plus display settings that control how they are presented. Filters let you organise your work around whatever matters to you — a category, a customer, an SLA, a teammate's queue.
Filters appear in the left navigation of the workspace. A filter you create is visible only to you unless you share it; administrators can create filters visible to everyone.
Alongside your own filters, the left navigation holds up to four built-in system filters: Inbox, My Queue, SPAM and Trash. Which of these you see depends on your permissions — see System Filters.
Staff with the Can view own requests ONLY permission do not get filters at all. They cannot see existing filters and cannot create new ones.
6.2. System Filters
HelpSpot ships four built-in filters in the left navigation. They cannot be edited or deleted.
| Filter | What it contains | Who sees it |
|---|---|---|
| Inbox | All open requests that are not assigned to anyone. The queue for new and unclaimed work. | Requires the "view Inbox" permission |
| My Queue | All open requests assigned to you. This is the default landing view for new accounts. Its count shows as unread / total. | Everyone |
| SPAM | Requests whose status is the configured spam status. Can be reviewed and restored. | Requires the "manage SPAM" permission |
| Trash | Requests moved to the trash. Can be restored, or removed permanently on the schedule set in Admin. | Requires the "manage Trash" permission |
Every other filter automatically excludes spam and trashed requests, so you never need a condition for that.
Reminders and Subscriptions are not filters
Reminders and Subscriptions are often mistaken for system filters. They are separate views, reached from the menu under your name in the top right rather than from the left navigation. They have no Options menu, no CSV export and no display column settings. See Subscriptions & Reminders Lists.
Customizing the Inbox and My Queue
Because system filters cannot be edited, the Inbox and My Queue have their own column setting: Customize Columns, in the Options menu above the request grid. It is offered only on those two — SPAM and Trash have fixed columns. It sets your columns and their widths; it does not set a sort order. See Filter Display Columns.
6.3. Creating a Filter
To create a new filter, click Create Filter in the left navigation panel below your existing filters. This opens the filter editor.
The filter editor has two tabs, Filter and Options.
The Filter tab
-
Filter Name — a descriptive name. This is the label that appears in the left navigation.
-
Who else can view this — the sharing setting. See Sharing Filters and Permissions.
-
In Folder — a dropdown of folders that already exist, defaulting to "-Top Level (no folder)", with an Add Folder button beside it. See Organizing Filters into Folders.
-
Display count in Workspace — shows the number of matching requests next to the filter name in the left navigation.
-
Match [all|any] of the following conditions, and the conditions themselves. Conditions are added one at a time with the + icon (Add condition) below the condition box; each click adds a blank row whose dropdown you choose the condition from. Picking ALL of the following are true or ANY of the following are true, under the Advanced heading in that dropdown, turns the row into a sub-condition group with its own + instead. See How Filter Conditions Work and Sub-Condition Groups.
The Options tab
Sort order, display columns, view type, grouping, urgent handling, keyboard shortcut, navigation placement, RSS and caching. See Filter Editor Options.
Previewing before you save
Before saving, use Run Filter to preview the results and confirm your conditions produce what you expect. The preview shows the first 10 matching requests along with a total count — the heading reads "(first 10 only)".
To see the complete set, tick the Show all results checkbox before clicking Run Filter. It sits beside the button; it is not something offered after the preview appears.
Set your display columns before running the preview if you want to see the results as they will actually appear.
Saving
Once satisfied, click Save Filter to add the filter to your workspace. When you are editing an existing filter the same button reads Save Edits, and a Save As button appears beside it — the quickest way to build a variation on a filter you already have.
To edit an existing filter, open it in your workspace and click Edit in the request grid header. Administrators and the filter’s creator can edit a filter; see Sharing Filters and Permissions.
6.4. Creating a Filter - Options Tab
The Options tab of the filter editor controls how results are displayed and where the filter appears.
A note on the name: the request grid also has a menu called Options — labelled Filter Options on the Inbox and My Queue. That is a different thing. See The Filter Options Dropdown Menu.
Settings on the Options tab
In the order they appear.
| Setting | What it does |
|---|---|
| Order | Default sort column and direction (Descending or Ascending). |
| Columns To Display | The columns in the request grid. See Filter Display Columns. |
| Default Filter View | Grid, or one of four stream views. "Default" because it can be overridden per visit. See Filter Views: Grid and Stream. |
| Group Requests By | Groups results under section headers by Category, Status, Assigned To, a date span, a custom field or a survey score, with its own direction. |
| Show Urgent Requests | At the top pulls urgent requests above everything else, overriding your Order — and above everything else within each group when Group Requests By is set. Inline leaves them in normal sort position. The default is At the top. |
| Keyboard Shortcut | A key that loads this filter from anywhere in the workspace. See Filter Keyboard Shortcuts. |
| Display filter above Inbox in left navigation (folder will be ignored) | Puts the filter in the top section of the navigation. As the label says, the filter's folder stops applying. |
| RSS feed should only contain public notes | Omits private notes from the filter's feed. See Filter RSS Feeds. |
| Never cache the workspace display count | Takes the filter out of the automatic cache schedule and caps its count at a one-minute cache instead. Not literally never, and it does not affect the rows — results are never cached either way. See Filter Caching and Performance. |
Settings people look for here but that live on the Filter tab
Filter Name, Who else can view this, In Folder, and Display count in Workspace.
There is no Take It button setting
Nothing in the editor switches a Take It button on or off. To put one on every row, add the Take it column under Columns To Display.
6.5. Deleting a Filter
A filter can be deleted by the person who created it, or by an administrator. Deletion is immediate and permanent — there is no undo and nothing to restore it from.
Deleting a filter
Open the filter, then choose Delete Filter from the Options menu above the request grid. HelpSpot asks for confirmation before it goes. See The Filter Options Dropdown Menu for the rest of that menu.
Delete Filter appears under the same rule as Edit: on filters you created, or on any filter if you are an administrator. It is not offered on the four system filters — the Inbox, My Queue, SPAM and Trash cannot be deleted at all. See System Filters.
What happens when a filter is deleted
Deleting a filter does more than remove it from your own left navigation. If anyone else could see it, this is what changes for them:
- It disappears for everyone at once. A shared filter is removed from the left navigation of every staff member it was shared with. Nobody is notified.
- Anyone using it as their default workspace is moved to My Queue. If a staff member had made the filter the view they land on at login, HelpSpot switches them to My Queue without telling them why their landing page changed.
- The sharing list goes too. The people and permission groups the filter was shared with are discarded along with it.
- It cannot be recovered. The filter's conditions, display columns and options are removed outright. Getting it back means building it again from scratch.
The deletion itself is recorded. HelpSpot writes an entry to the Audit Log showing which staff member deleted which filter, and when. That entry identifies the filter but does not preserve what was in it, so the log answers "who removed it" — not "what did it contain". See Audit Log.
Before deleting a filter other people use
Open the filter editor and check Who else can view this on the Filter tab. Anything other than Only me means other people have it in their navigation, and one of them may be landing on it every morning. See Sharing Filters and Permissions.
Deleting a filter you cannot open
A filter can end up in a state where it will not load — most often because something it referenced no longer exists, such as a category or a custom field that has since been deleted. The usual Delete Filter option lives inside the filter, so a filter that will not open cannot be removed that way.
Administrators can delete it from Admin > System > Filter Management instead. That page lists every filter in the system, including other staff members' personal filters, and each row carries its own delete link that works without opening the filter. See Filter Management.
The same page is the practical place to remove a filter belonging to someone who has left, or to work through a backlog of unused filters in one sitting.
Two recent changes make a stuck filter less likely in the first place:
- As of HelpSpot 5.8.4, deleting a custom field that is still referenced by a filter, automation rule or report warns you first, so you can update the filter before the field disappears. See Custom Fields.
- As of HelpSpot 5.8.5, a filter sorted by a custom field that was later deleted falls back to sorting by request ID instead of failing to load.
On earlier versions — or where the filter references a deleted category rather than a custom field — Filter Management is still the way to clear it out.
6.6. How Filter Conditions Work
Conditions decide which requests a filter returns. Each condition names a field, sometimes an operator, and usually a value. Many conditions have no operator at all — they are a single dropdown — and a few, like Is urgent, are just the condition itself.
Adding a condition
Conditions are added with the + icon (Add condition) below the condition box. Each click adds a blank row with a dropdown on the left; choose a condition there and the row rebuilds itself with whatever operator and value controls that condition needs. Every row has a remove icon at its end (Remove condition).
Choosing a condition from under the Advanced heading — ALL of the following are true or ANY of the following are true — turns the row into a group instead, with its own + for the conditions inside it. See Sub-Condition Groups.
Matching all or any
Above the conditions is a single sentence: Match [all|any] of the following conditions.
- all — a request must satisfy every condition. This is the default and the usual choice; each condition narrows the results further.
- any — a request qualifies if it satisfies at least one.
With all, "Category is Billing" and "Status is Active" returns requests that are both. With any, it returns requests that are either.
For logic that a single all-or-any cannot express, see Sub-Condition Groups.
6.7. Filter Conditions Reference
This page lists every condition available when building a filter, in the groups and order the condition dropdown uses.
Six operators recur throughout, referred to below as the text operators: Is, Is Not, Begins with, Ends with, Contains, Does not contain. Three more appear on numeric and time fields: Less than, Greater than, and Is.
Customer Information
All five take the text operators.
| Condition | Matches against |
|---|---|
| Customer ID | The customer's ID from your own system |
| Customer email address | |
| First name | Customer first name |
| Last name | Customer last name |
| Phone | Customer phone number |
Request Details
| Condition | Operator | Value |
|---|---|---|
| Request ID | Is / Less than / Greater than | A number |
| Assigned to | Is / Is Not | Staff list, plus Unassigned and Logged In User |
| Category | Is / Is Not | Category list — one category per condition. Two categories means a sub-condition group. |
| Status | Is / Is Not | Status list |
| Open/Closed | none | all / closed / open |
| Is urgent | none | none |
| Is Not urgent | none | none |
| Reporting Tags | none | A single Category / Tag pair. Tags belong to categories, so the same tag name in two categories is two different tags. |
| Without reporting tags | none | A single Category / Tag pair |
| Opened By | Is / Is Not | Staff list |
| Email subject | Text operators | Free text |
| Contacted via | Is / Is Not | See below |
| Mailbox | Is / Is Not | Mailbox list |
| Sending Mailbox | Is / Is Not | Mailbox list |
| Portal | Is / Is Not | Portal list |
| AI Detected Out of Office | none | Yes / No |
| AI Auto Categorized | none | Yes / No |
Note that urgency is two separate conditions with no value, not one condition with a yes/no.
Contacted via offers fourteen values, not the four people expect: Email, Phone, Walk In, Mail, Web Form, Other, Web Service, Forum, Instant Messenger, Fax, Voicemail, Staff Initiated, Tab Widget, HelpSpot Mobile App. Portal is not among them — it is the separate Portal condition.
Custom Fields
Every custom field appears under its own name. This group sits third in the list, not at the bottom.
| Field type | Operator | Value |
|---|---|---|
| Text, Large Text, Live Lookup | Text operators | Free text |
| Predefined List | Is / Is Not | The field's options |
| Checkbox | none | Checked / Not Checked |
| Number, Decimal | Is / Less than / Greater than | A number |
| Date | Is / Less than / Greater than, plus a relative list | A date, or a relative value including Date is set and Date is not set |
| Date/Time | Less than / Greater than, plus the relative list | As above |
| Drill Down | Is / Is Not / Begins with | The field's values |
| Regular Expression | Text operators | Free text — the regex validates what you type into the field, it is not a match operator |
A filter sorted by a custom field that is later deleted falls back to sorting by request ID rather than failing, as of HelpSpot 5.8.5. Before deleting a field, check what still references it — see Custom Fields.
Search
Request history full-text search for searches an index built from the request title and summary, customer details, custom field content, attachment filenames, and every history note.
Three things to know before relying on it:
- A search inside a filter is not the same as the global search function. When combined with other conditions, the filter falls back to a substring match rather than the full-text engine, so the same term can return different results in the two places.
- Results are capped — 2,000 requests on MySQL, 5,000 on SQL Server — silently. A broad search in a large installation will be silently truncated.
- The on-screen note applies: matches all words individually, not as an exact phrase. Use quotes for exact phrase matching, e.g. "Foo Bar".
Date and Time
Relative dates recalculate every time the filter runs. Five conditions, all sharing the same fourteen values — Today, Yesterday, Past 7 / 14 / 30 / 60 / 90 / 365 Days, This Week (Sun–Sat), This Month, This Year, Last Week (Sun–Sat), Last Month, Last Year. Two of them anchor on a single date:
| Condition | Anchored on |
|---|---|
| Relative Date Since Opened | Date opened |
| Relative Date Since Closed | Date closed |
The other three ask a different question. Rather than anchoring on one date, each matches a request that has any history entry of the relevant kind inside the window — so a request updated in August and again in September still matches a window of August. They are about whether something happened during the period, not about when the most recent thing happened.
| Condition | Matches a request with |
|---|---|
| Request Updated | Any history entry at all inside the window — notes and updates, public or private, from staff, customers or automation rules. |
| Request Publicly Updated | Any public note inside the window, whoever wrote it. |
| Customer Updated Request | Any public note written by the customer inside the window, excluding their opening message. |
Fixed dates — a date picker each: Opened Before Date, Opened After Date, Closed Before Date, Closed After Date.
Elapsed time — all of these are in MINUTES. The operator is Less than or Greater than only; there is no "equals". The field has a Calculate Minutes helper beside it. The last two carry both names, because they were renamed in 5.8.5.
| Condition | Measures |
|---|---|
| Minutes since opened | Age of the request |
| Minutes since closed | Time since it was closed |
| Minutes since last update | Time since any update, including internal notes |
| Minutes since last public update | Time since the last customer-visible note |
| Minutes since last customer update | Time since the customer last wrote |
| First Response Speed All Hours (Minutes) 5.8.5 and later Minutes since first response (all hours) 5.8.4 and earlier |
Time from opening to the first staff reply. Only matches requests that have already been answered — see below. |
| Wait Time Since Last Customer Update (minutes) 5.8.5 and later Customer wait time (minutes) 5.8.4 and earlier |
Time the customer has been waiting since their last message — but only while that message is the most recent one on the request. If a staff member has replied since, the condition returns that past response gap instead — see below. |
Useful conversions: one hour 60 · four hours 240 · eight hours 480 · one day 1440 · one week 10080.
Conditions renamed in HelpSpot 5.8.5
If you are following older instructions, or running an older version of HelpSpot, two conditions in the Date and Time group are now called something different. Only the labels changed. The measurements are identical, and saved filters using them keep working untouched.
| Old name — 5.8.4 and earlier | New name — 5.8.5 and later |
|---|---|
| Minutes since first response (all hours) | First Response Speed All Hours (Minutes) |
| Customer wait time (minutes) | Wait Time Since Last Customer Update (minutes) |
The matching display column Customer Wait Time was renamed to Wait Time Since Last Customer Update at the same time — see the Filter Display Columns Glossary.
First Response Speed All Hours (Minutes) only matches requests that have already been answered. A request still waiting for its first reply has no response time, and is excluded from the condition entirely. So it cannot express "approaching the first-response target" — it can only report on responses already sent. For the live version, use Wait Time Since Last Customer Update (minutes), which on an unanswered request measures the time since the customer wrote. See Example: SLA Compliance Across Tiers.
Wait Time Since Last Customer Update (minutes) measures one of two different things, depending on who wrote last. When the customer's last public message is the most recent thing on the request, the condition returns now − that message — a live wait that grows until someone answers. When a staff member has replied since, it instead returns last staff reply − last customer message: a historical gap that is fixed and never changes again. A filter built on this condition alone therefore also matches requests nobody is waiting on — ones that were answered days ago. Pair it with Last public reply from → Customer to restrict the results to requests that have had no reply yet.
There is no business-hours condition. First Response Speed (biz hours) exists as a display column and as a sort option, so you can show and sort by it — but you cannot filter on it. An SLA measured in business hours can be displayed but not selected for.
Assignment Chain
These look at the whole history of assignments, not just the current one. None take an operator.
| Condition | Value |
|---|---|
| Reassigned from/to | Two staff dropdowns — from, and to |
| Was ever assigned to | Staff list |
| Reassigned by | Staff list, plus System |
Other
| Condition | Operator | Value |
|---|---|---|
| Number of public updates | Is / Less than / Greater than | A number |
| Last public reply from | none | Customer, Any staff member, Logged In User, or a named staff member |
|
Updated By (use with other conditions) |
none | Staff list |
Advanced
ALL of the following are true and ANY of the following are true create sub-condition groups. Choosing either one turns that condition row into a group header with its own + icon for the conditions inside it, and one blank condition appears in the group ready to fill in — see Sub-Condition Groups. Note that these two entries disappear from the dropdown when you are already inside a group: groups cannot be nested.
Custom "where" clause (SQL) appears for administrators only — see Custom SQL WHERE Clause in Filters.
Integrations
Thermostat conditions. They are always listed, whether or not Thermostat is set up; they simply match nothing when it isn't.
| Condition | Operator | Value |
|---|---|---|
| Thermostat NPS Score | Is / Less than / Greater than / Type | A number, or with Type: Promoter / Passive / Detractor |
| Thermostat CSAT Score | Is / Less than / Greater than / Type | A number, or with Type: Satisfied / Dissatisfied |
| Has Thermostat Feedback | none | Yes / No |
Note the third one: it asks whether written feedback exists, and cannot search the text of it.
Surveys
Native HelpSpot surveys add one condition each, named #[id] [Survey name] Score.
| Operator | Meaning |
|---|---|
| Is / Less than / Greater than | Compare the numeric score |
| Type | Match a scoring bucket — the options depend on that survey's scoring type (a 0–10 survey offers Detractors / Passives / Promoters, a 1–5 CSAT offers Dissatisfied / Satisfied) |
| Has Response / No Response | Whether the customer answered |
| Has Comment / No Comment | Whether they left written feedback |
There is no condition for searching survey comment text.
A note on case sensitivity
Text matching follows your database's collation. On a standard MySQL installation it is case-insensitive. On SQL Server it depends how the database was created. If case matters to a filter you are building, test it rather than assuming.
6.8. Sub-Condition Groups
A sub-condition group is a set of conditions with its own all/any logic, evaluated as a unit inside the filter. It is what lets you write "this, and either of those".
Adding one
There is no separate button. In the condition dropdown, under the Advanced heading, pick either:
- ALL of the following are true
- ANY of the following are true
That turns the row into a group header with its own + icon beside it, and drops one blank condition inside the group ready to fill in.
From then on there are two + icons on the page and they do different things: the one on the group header adds a condition inside that group, and the one below the whole condition box adds another top-level condition. New inner conditions are inserted directly beneath the group header, so a group can end up listing them in the reverse of the order you entered them — which changes nothing about how it evaluates.
One level only
Groups cannot contain other groups. Once you are inside a group, the two Advanced options disappear from the dropdown. A filter can have several groups side by side, but none of them can be nested.
This is the single most important constraint when designing a complex filter, and it is worth planning around before you start clicking. If the logic you want needs two levels of nesting, you have three options: restate it so it fits one level (see Example: Escalation Dashboard, which does exactly this), split it into several filters (see Example: SLA Compliance Across Tiers), or accept a broader filter and sort to bring the relevant rows to the top.
How a group combines with everything else
A group's own all/any applies to its members. The group as a whole is then joined to the filter's other conditions by the filter's top-level Match all/any. So a group inside a Match all filter is AND-ed in; the same group inside a Match any filter is OR-ed in.
6.9. The Filter Options Dropdown Menu
Above every filter's request grid is a row of actions — Edit, Stream, and Options. On the Inbox and My Queue the menu is labelled Filter Options.
| Item | Where | Appears when |
|---|---|---|
| Edit | Header row | On filters you created, or any filter if you are an administrator. Not on system filters. Opens the filter editor. |
| Stream | Header row | Always. Switches to the stream view without changing the filter's saved default. |
| Delete Filter | Options menu | Same rule as Edit. Asks for confirmation. |
| Customize Columns | Options menu | Inbox and My Queue only — this is how their columns get changed. |
| RSS Feed | Options menu | When RSS feeds are enabled system-wide. |
| CSV Export | Options menu | Exports the current results. |
| Make Default Workspace | Options menu | When this filter is not already your default. Makes it the view you land on at login. |
6.10. Filter Display Columns
Each filter controls which columns appear in its request grid. Columns can be selected and reordered to show the information most relevant to that filter’s purpose.
Configuring columns
Columns are set in the filter editor under Options, in the Columns To Display control. Drag to reorder.
Column widths
A column’s width can be typed directly in the picker by clicking the width value next to the column name, or adjusted in the request grid by dragging the column borders.
Five columns take no fixed width. They share whatever space is left after the fixed columns:
-
Email Subject
-
Request Summary
-
Initial request
-
Latest Public Note
-
Latest Private Note
Clicking the width on one of these shows a note rather than a width box. If you add more than one of them to the same filter they split the remaining space between them, so each ends up narrow — pick the one that matches what you are scanning for.
The Inbox and My Queue
The Inbox and My Queue are system filters and cannot be edited, but each user can set their own columns for them using Customize Columns in the Options menu above the request grid. This is offered on those two only — SPAM and Trash have fixed columns.
Which columns are available
There are roughly 45 columns, in eight groups, plus one for every custom field and two for every customer survey. Each one is defined in Filter Display Columns Glossary & Definitions, which gives the name as it appears in the picker, the header it renders as in the grid, whether you can sort by it, and what it shows.
CSV exports
Whatever columns are configured on a filter also determine the contents of its CSV export. A few columns behave differently in the export — see Exporting Filter Results to CSV.
6.11. Filter Display Columns Glossary & Definitions
This is a glossary of every column you can add to a filter, including what it shows and how it behaves.
To change which columns a filter uses, see Filter Display Columns. This article covers what each column contains once you've added it.
How to read this reference
The columns are listed in the same groups and in the same order the filter editor's column picker uses, so you can scan this alongside the dropdown.
- Column — the name as it appears in the picker.
- Grid header — the label that appears at the top of the column in the ticket view (this could be in an inbox or in a filter). For several columns this is shorter than the picker name (the picker says "Request ID", the grid header says "ID"). Where the two differ, both are given.
- Sortable — whether you can click the grid header to sort by that column. Non-sortable columns show a plain header with no link. Sorting is not available in the Run Filter preview; save the filter and open it first.
The CSV export uses the grid header name, not the picker name. A few columns behave differently in the export — those are called out in Columns in the CSV export at the end.
Special Columns
| Column | Grid header | Sortable | What it shows |
|---|---|---|---|
| Replied To | (blank) | Yes | An icon when the most recent reply on the request came from staff rather than the customer. Hover the icon to see which staff member replied. Nothing displays when the customer replied last. This is one of the default columns on a new custom filter; it is not among the Inbox or My Queue defaults. |
| Take it | (blank) | No | A Take it button on each row that assigns the request to you and opens it, without needing to open the request first. |
Customer Information
| Column | Grid header | Sortable | What it shows |
|---|---|---|---|
| Customer ID | Customer ID | Yes | The customer's ID from your own system, if one has been set on the request (via Live Lookup, the API, or manual entry). Blank otherwise. |
| Customer | Customer | Yes | The customer's full name. One of the default columns on new filters and on the Inbox and My Queue. |
| Last Name | Last Name | Yes | The customer's last name only. Useful when you want a narrow, tidily sortable name column. |
| Yes | The customer's email address. | ||
| Phone | Phone | Yes | The customer's phone number. |
Request Details
| Column | Grid header | Sortable | What it shows |
|---|---|---|---|
| Open/Closed | Open | Yes | Whether the request is currently open. Exports as Yes/No. |
| Request ID | ID | Yes | The request's numeric ID, linked to the request. |
| Assigned To | Assigned To | Yes | The staff member the request is currently assigned to. Blank when unassigned. A default column on new filters. |
| Category | Category | Yes | The category the request is in. |
| Mailbox | Mailbox | No | The mailbox the request arrived in. Only meaningful for email requests. |
| Sending Mailbox | Sending Mailbox | No | The mailbox replies to this request are sent from. This can differ from the receiving mailbox — see Default Send From and Send Outbound Email Via Settings. |
| Reporting Tags | Reporting Tags | No | The reporting tags applied to the request. Multiple tags appear in one cell. |
| Portal | Portal | No | The portal the request was submitted through, for requests that came in via a portal. |
| Opened By | Opened By | Yes | The staff member who created the request. Blank for requests the customer created themselves. |
| Status | Status | Yes | The request's current status. |
| Email Subject | Email Subject | Yes | The subject line of the originating email. This is a flexible-width column — see Column widths below. |
| Contacted Via | Contacted Via | No | An icon showing how the request arrived — email, phone, web form, and so on. A default column on new filters and on the Inbox and My Queue. Exports as the text name rather than an icon. |
| AI Detected Out of Office | AI Detected Out of Office | No | A checked box when HelpSpot AI identified the most recent customer message as an out-of-office auto-reply. Requires HelpSpot AI. |
| AI Auto Categorized | AI Auto Categorized | No | A checked box when the request's category was set by HelpSpot AI rather than by a person or a rule. Requires HelpSpot AI. |
| Attachments | Attachment Count | No | A paperclip icon when the request has at least one attachment. A default column on the Inbox and My Queue. Exports as Yes/No. |
Request History
| Column | Grid header | Sortable | What it shows |
|---|---|---|---|
| Request Summary | Request Summary | No | The AI summary of the request if one exists; otherwise the opening text of the initial request, cleaned up for display. This is the column most people mean by "the request text". A default column on new filters and on the Inbox and My Queue. Flexible width. |
| Initial request | Initial request | No | The initial request text, always — this column never substitutes the AI summary. Use it when you want the customer's own words even on requests that have been summarized. Flexible width. |
| Latest Public Note | Latest Public Note | No | The most recent customer-visible note on the request, whoever wrote it. Flexible width. |
| Latest Private Note 5.8.4 and later |
Latest Private Note | No | The most recent internal staff note. Flexible width. |
| Latest Public Note By | Latest Public Note By | No | Who wrote the most recent public note. Shows "Customer" for customer replies and the system name for notes HelpSpot generated itself. |
| Latest Update By | Latest Update By | No | Who made the most recent update of any kind, public or private. Same "Customer"/system handling as above. |
| Public Update Count | # | Yes | How many public notes are on the request. A high count on an open request usually means a conversation that's gone back and forth without resolving. |
| Time Tracker Total | Time | Yes | Total tracked time on the request, formatted as hours and minutes. Requires time tracking to be enabled. Exports as a raw number of seconds, not the formatted time. |
Columns renamed in HelpSpot 5.8.5
One column has a new label. Only the label changed — the measurement is identical, and saved filters using it keep working untouched. Both names are shown in the Date and Time table above.
| Old name — 5.8.4 and earlier | New name — 5.8.5 and later |
|---|---|
| Customer Wait Time | Wait Time Since Last Customer Update |
The two matching filter conditions were renamed at the same time — see the Filter Conditions Reference.
Custom Fields
Every custom field defined under Admin > Custom Fields is available as a column, listed under its own field name. All custom field columns are sortable.
How the value renders depends on the field type:
| Field type | Displays as |
|---|---|
| Checkbox | A checked or unchecked box |
| Drill Down | The full path, reformatted for readability |
| Date | A short date |
| Date and Time | Date and time |
| Decimal | A number, using the decimal places configured on the field |
| Text, Large Text, Predefined List, Numeric, Regex, AJAX | The stored value as text |
If a filter is sorted by a custom field and that field is later deleted, the filter falls back to sorting by request ID instead of failing, as of HelpSpot 5.8.5.
Date and Time
| Column | Grid header | Sortable | What it shows |
|---|---|---|---|
| Age | Age | Yes | How long ago the request was opened, in plain language ("3 days"). Sorts by date opened. A default column on new filters and on the Inbox and My Queue. |
| Date Opened | Opened | Yes | The date the request was opened, without the time. |
| Date and Time Opened | Opened | Yes | The date and time the request was opened. Pick this one or Date Opened, not both — they carry the same underlying Date value and produce the same grid header. |
| Date Closed | Closed | Yes | The date the request was closed. Blank while the request is open. |
| Date and Time Closed | Closed | Yes | The date and time the request was closed. Same either/or as the opened pair. |
| Last Update | Last Update | Yes | When the request was last updated in any way, including internal notes and staff-only changes. |
| Last Public Update | Last Public Update | Yes | When the most recent customer-visible note was added, whether by staff or by the customer. |
| Last Customer Update | Last Customer Update | Yes | When the customer last replied. |
| Last Public Staff Update 5.8.5 and later |
Last Public Staff Update | Yes | When a staff member last added a customer-visible note. Unlike Last Public Update, customer replies don't move this date, so it answers "how long since we last responded?" Blank if staff have never replied publicly. |
| First Response Speed (all hours) | First Response Speed (all hours) | Yes | Elapsed time between the request opening and the first staff response, measured in wall-clock time. |
| First Response Speed (biz hours) | First Response Speed (biz hours) | Yes | The same measurement counting only your configured business hours. Requires business hours to be set up in Admin. On a filter mixing calendar-time and business-hours SLAs, add both columns so staff can see which measurement applies to each row. Note this measurement is available as a column and as a sort option only — there is no business-hours condition, so you cannot filter on it. |
| Wait Time Since Last Customer Update 5.8.5 and later Customer Wait Time 5.8.4 and earlier |
Wait Time Since Last Customer Update 5.8.5 and later Customer Wait Time 5.8.4 and earlier |
Yes | How long the customer has been waiting since their last message without a staff response. The metric to sort on for an escalation view. The rename changed the label only; the measurement is unchanged. |
Integrations
These columns are for the Thermostat integration and populate only on requests that received a Thermostat survey response. Requests with no response show a dash.
| Column | Grid header | Sortable | What it shows |
|---|---|---|---|
| Thermostat NPS Score | Thermostat NPS Score | Yes | The 0–10 score, with a colored Promoter / Passive / Detractor label. |
| Thermostat CSAT Score | Thermostat CSAT Score | Yes | The CSAT score, with a colored Satisfied / Dissatisfied label. |
| Thermostat Feedback | Thermostat Feedback | Yes | The customer's written feedback from the survey. |
See Viewing Survey Results In Filters for more on Thermostat data in filters.
Surveys
This group appears only if you have created native HelpSpot surveys. Each survey adds two columns, named for the survey:
| Column | Sortable | What it shows |
|---|---|---|
| [Survey name] (#id) Score | Yes | The score the customer gave on that survey, with a colored label for the bucket it falls into. The buckets depend on the survey's scoring type. A dash means no response. |
| [Survey name] (#id) Feedback | Yes | The written comment the customer left on that survey. |
Native surveys are separate from the Thermostat integration and have their own columns and conditions. See Creating Surveys and Using Survey Data in Triggers, Filters and Automation Rules.
Columns you'll see but can't choose
A few columns are added automatically and aren't in the picker:
- Read / Unread — the unread indicator in the Inbox and My Queue. Click it to toggle a request back to unread.
- Customer photo — the avatar shown at the start of a row where one is available.
- Trashed On — the date a request was trashed. Appears in the Trash filter only.
Column widths
Most columns take a fixed pixel width, which you can set by clicking the width value next to the column name in the picker, or by dragging the column border in the request grid.
Five columns are flexible-width instead — they share whatever space is left after the fixed columns:
- Email Subject
- Request Summary
- Initial request
- Latest Public Note
- Latest Private Note
Clicking the width on one of these shows a note rather than a width box. If you add more than one of them to the same filter, they split the remaining space between them, so each ends up narrow. Pick the one that matches what you're scanning for.
Default columns
If you haven't customized anything:
- New filters start with Replied To, Contacted Via, Open/Closed, Customer, Assigned To, Request Summary, and Age.
- The Inbox and My Queue start with Contacted Via, Customer, Request Summary, Age, and Attachments.
Columns in the CSV export
A filter's CSV export contains the columns configured on that filter, with these differences:
- The export uses the grid header name as the CSV header, so a column added as "Request ID" exports as "ID".
- A linked request ID column is added to the front of the export automatically, headed ID, whether or not the filter displays one. This happens only on filters you create — Inbox, My Queue and SPAM exports do not get it.
- Three columns are dropped: Read / Unread, Replied To, and the system Inbox's Take it button. This is a fixed list of three, not a rule about icon columns — Attachments, AI Detected Out of Office and AI Auto Categorized are also rendered as icons and are kept, exporting as Yes/No.
- Yes/No columns (Open/Closed, Attachments, checkbox custom fields) export as the words Yes and No.
- Contacted Via exports the method name as text rather than an icon.
- Time Tracker Total exports a raw number of seconds rather than the formatted time. Convert in your spreadsheet if you need hours.
- A sort you clicked on a column heading in the grid is not carried into the export — the CSV always uses the filter's own saved Order.
- All formatting is stripped, so note columns export as plain text.
See Exporting Filter Results to CSV.
6.12. Exporting Filter Results to CSV
Open the filter and choose CSV Export from the Options menu above the request grid.
Not available on the Reminders or Subscriptions views.
What the export contains
The columns configured on the filter, for every matching request. There is no row limit and no separate export configuration — to change what is in the CSV, change the filter's display columns.
On filters you create, a linked request-ID column is added to the front automatically, headed ID. Inbox, My Queue and SPAM exports do not get it.
Differences from what you see on screen
| In the grid | In the CSV |
|---|---|
| Column names as they appear in the picker | The short header name — "Request ID" exports as "ID", "Time Tracker Total" as "Time" |
| Read / Unread, Replied To, and the Inbox's Take it | Dropped |
| Attachments, AI Detected Out of Office, AI Auto Categorized | Kept, as Yes / No |
| Contacted Via icon | The method name as text |
| Time Tracker Total as h:mm | Raw seconds |
| Formatted note text | Plain text, HTML stripped |
| Whatever column you last clicked to sort | The filter's own saved Order — a sort you clicked in the grid is not carried into the export |
Including note content
By default an export shows the initial request, not the work done on it. Add Latest Public Note or Latest Private Note to the filter to include note text. Teams that write a closing summary as the last note find this makes exports usable as a record of work performed.
6.13. Sharing Filters and Permissions
Sharing is set on the Filter tab, in the Who else can view this dropdown.
| Option | Who sees it | Who can choose it |
|---|---|---|
| Only me | Just you | Anyone |
| Everyone | All staff | Administrators only |
| Permission group… | Members of the groups you pick | Administrators |
| My group: [name] | Members of your own permission group | Non-administrators — this is what appears in place of "Permission group…" |
| Specific people… | Staff you select individually | Anyone |
You can always see and edit your own filters.
Shared filters appear in other people's left navigation mixed in with their own, sorted by folder and then name.
Permission notes
- Staff with Can view own requests ONLY cannot see filters and cannot create them (the Create Filter button is hidden).
- Staff with Limit to assigned categories ONLY see shared filters normally, but results are always narrowed to their categories, whatever the filter's own conditions say.
- Only the filter's creator, or an administrator, can edit or delete a filter.
6.14. Filter Best Practices
Naming and organisation
- Use descriptive names. "Billing — Unassigned — Urgent" tells you what it holds. Avoid "My Filter" and "Test".
- Use folders once you have more than a handful. Group by team, workflow or SLA tier. Remember folders are one level and collapsed by default.
- Prefix shared filters consistently — "Global: …" or "[Team]: …" — so people can tell shared from personal at a glance.
- Don't set both a folder and Display above Inbox on the same filter. The folder is ignored.
Conditions and performance
- Build up gradually and use Run Filter after each change, so it is clear which condition caused a surprise. The preview shows 10 rows unless you tick Show all results first.
- Remember elapsed-time conditions are in minutes. The most common filter-building mistake is entering hours.
- Plan around the single grouping level before you start. If your rule needs two levels, either flatten it (see Example: Escalation Dashboard) or split it into several filters (see Example: SLA Compliance Across Tiers).
- Prefer relative dates for ongoing filters, fixed dates for one-off investigations.
- Watch filter breadth. A filter with few conditions that matches a large share of requests is slow to run and slow to load.
- Use Never Cache sparingly — only where a live count genuinely matters.
Sharing
- Everyone filters are for organisation-wide standards. Only administrators can create them.
- Permission group filters for team queues — but note a non-administrator can only share with their own group.
- Specific people for temporary collaboration, like sharing a troubleshooting view during an incident.
Workspace setup
- Set your most-used filter as your landing view: open it and choose Make Default Workspace from the Options menu above the grid. It is not in your user preferences.
- Use Display Above Inbox for two or three filters at most. Everything at the top means nothing is.
- Keyboard shortcuts need switching on first — the preference is off by default. There are seventeen keys to choose from: the number keys
4 5 6 7 8 9 0and the punctuation keys-=[]\;',./. No letters are available, so mnemonics are out. Assign them in the order you use the filters: top filter4, next5, and so on.
6.15. Filter Views: Grid and Stream
Every filter has a Default Filter View, set on the Options tab. It offers five views:
| View | What it shows |
|---|---|
| Grid | The standard table, with your configured columns. Best for scanning volume and for batch actions. |
| Stream: Staff Only | Public staff replies only. |
| Stream: Staff Only w/ Private | All staff notes, public and private. Customer messages are not included. |
| Stream: Customers Only | Public customer messages only. |
| Stream: Customers and Staff | Public messages from both sides. Private notes are not included. |
Grid
Stream: Staff Only
Stream: Staff Only w/ Private
Stream: Customers Only
Stream: Customers and Staff
The two names most often picked wrongly are the last two. If you want to see everything a staff member has written, including internal notes, that is Staff Only w/ Private — "Customers and Staff" sounds broader but is public-only.
Stream views ignore display columns entirely; they render request history entries, not table rows. They load 20 items at a time with a Load More button, and refresh roughly every 20 seconds — near-live, not instant.
"Default" is the operative word: any filter can be opened as a stream from the Stream link above the grid without changing what it is saved as, and the stream page has its own selector for switching between the four stream types on the fly. Stream is available for saved filters and for the Inbox and My Queue.
6.16. Filter Keyboard Shortcuts
A filter can be given a keyboard shortcut that loads it from anywhere in the workspace. To set this, go to the filter, then click Edit > Options tab under Keyboard Shortcut.
The available keys
You pick from a fixed list. There are no letters. The available keys are:
4 5 6 7 8 9 0 - = [ ] \ ; ' , . /
1, 2 and 3 are reserved for your default workspace, the Inbox and My Queue.
Keys already used by another filter you can see are removed from the list, so you cannot create a collision from the editor.
Two things that surprise people
Shortcuts are stored on the filter, not on your user account. A shortcut you set on a shared filter applies for everyone who can see that filter. Because the editor can only hide keys used by filters you can already see, a collision can still arise after the fact — when a filter carrying the same key is shared with you later, or when a filter you cannot see is already using it. Where a collision does happen, a filter shared with Everyone takes precedence over a personal one.
Shortcuts do nothing until you switch them on. The preference is Enable Keyboard Shortcuts in Workspace, in your user settings, and it is off by default. This is the usual reason a correctly-configured shortcut appears to do nothing.
6.17. Filter Caching and Performance
The count beside a filter name in the left navigation is cached. How long depends on how heavily the filter is used:
| Filter usage | Cache duration |
|---|---|
| Top 5% most viewed | 5 minutes |
| 75th–95th percentile | 10 minutes |
| 50th–75th percentile | 30 minutes |
| Below 50th percentile | 60 minutes |
Two things worth knowing about how those tiers are set. They are recalculated once a day by a scheduled maintenance job, so a filter's tier reflects yesterday's usage. And only filters with Display count in Workspace switched on are ranked at all — if fewer than ten filters have usage data, every filter simply gets 5 minutes.
Never cache the workspace display count in Edit Filter > Options tab does not quite mean never. It takes the filter out of the tier schedule above and caps its count at a one-minute cache instead — so the number can still be up to a minute old, rather than up to an hour. Use it only where a nearly live count matters; it costs database work on almost every workspace load.
Caching only ever affects the count. Opening a filter always runs it fresh against the database — the rows you see are never served from a cache — and running it replaces the cached count. So a stale number in the left navigation corrects itself the moment you click it.
Finding the filters that are actually slow
Caching hides a slow filter rather than fixing it, so a workspace that feels sluggish is usually one or two filters with very broad conditions rather than the cache. Administrators can see which ones at Admin > System > Filter Management, which reports each filter's average run time and how often it is being run. See Filter Management.
6.18. Why do filters not show all items?
Filters may not display all expected items when the system is configured to only return records from a limited number of previous days. If some items are older than the configured limit, they will not appear in filter results.
Cause
The Filter Within Previous (days) setting in Admin > Settings limits how many days back a filter will return records for. The default value is 365 days.
If some assigned requests are older than this limit, they will not be shown in the filter results.
Resolution Options
Option 1: Increase the global limit
- Go to Admin > Settings.
- Find Filter Within Previous (days).
- Increase the value to include older records.
- Save the changes.
Option 2: Override the limit on a specific filter
- Edit the filter that is not showing all expected items.
- Add a date criteria to the filter.
- Widen the date range so it includes older requests.
- Save the filter.
6.19. Organizing Filters into Folders
Filters can be grouped into folders in the left navigation. The In Folder control is on the Filter tab of the editor.
It is a dropdown, not a text box. It lists folders that already exist on filters you can see, and defaults to -Top Level (no folder). To make a new one, use the Add Folder button beside it.
Folders are a single level — no folders inside folders. In the navigation they are collapsible, and collapsed by default; the workspace remembers which ones you have opened.
One interaction to watch: if a filter has Display filter above Inbox in left navigation switched on, its folder is ignored. The checkbox label says so. Pick one or the other.
6.20. Filter RSS Feeds
Each filter can be read as an RSS feed, which is a convenient way to watch a queue from outside HelpSpot.
The URL is /admin/rss/{filter_id}. Feeds also exist for the Inbox, My Queue, SPAM, Reminders and Subscriptions, subject to the same permissions as the views themselves.
Three things to check before relying on a feed
RSS must be enabled system-wide: Admin > Settings > System > RSS Feeds Enabled. It is on by default, but when it is off, feeds return a single item reading "RSS feeds disabled" and the RSS link disappears from the Options menu.
Feeds use HTTP Basic Auth with your HelpSpot staff credentials — your email address and password, not a username.
Two-factor authentication blocks RSS. If your account has 2FA enabled, feed authentication is refused outright. There is no app-password alternative. This is the most common reason a feed that used to work stops.
Limiting a feed to public notes
The RSS feed should only contain public notes option on the Edit Filter > Options tab omits private notes from the feed — useful when sharing a feed outside the support team.
It applies only to filters you create. The Inbox, My Queue and SPAM feeds ignore it, and the Reminders and Subscriptions feeds never receive it, so those five always include private notes. Don't share them outside the team.
6.21. Example: Custom Team Inbox
Scenario
A team wants an inbox-style queue of unassigned requests in their category that members can claim directly.
Why this works
This is the system Inbox scoped to one category. The Take it column puts a button on each row that assigns the request and opens it in one click — that button is a column, not a setting, which is the part people hunt for and don't find.
If you are not an administrator
The Permission group… option is administrator-only. A non-admin sees My group: [name] instead, which shares with their own group and nothing else. If the team you want is not your own group, an administrator has to set the sharing.
Setup
On the Filter tab. Each condition is added with the + icon (Add condition) below the condition box; none of them needs a sub-condition group.
- Filter Name: Account Inquiries Inbox
- Match all:
- Open/Closed → open
- Category Is Account Inquiries
- Assigned to Is Unassigned
- Tick Display count in Workspace
- Who else can view this → Permission group…, and pick the team's group
On the Options tab:
- Columns To Display — add the Take it column
- Order: Date Opened, Ascending
Category, status and reporting tag names in this example are placeholders — substitute the ones your installation actually uses.
Resulting logic
Open = Yes
AND Category = Account Inquiries
AND Assigned to = Unassigned
6.22. Example: Escalation Dashboard
Scenario
A manager wants one view of everything needing escalation. A request qualifies if it is urgent and the customer has waited more than 2 hours, or not urgent but has waited more than 8 hours and written more than once without a reply. Only open requests in Billing or Technical Support.
The shape of the problem
Every request has to clear the same 2-hour wait, urgent or not. A request that is not urgent then has to meet two further requirements: the customer must have been waiting more than 8 hours, and must have written more than once. Being urgent is what lets a request skip those two.
That is the idea to hold on to, because it is exactly how the filter gets built.
A note on names
This example uses the HelpSpot 5.8.5 labels. On 5.8.4 and earlier, the condition Wait Time Since Last Customer Update (minutes) is called Customer wait time (minutes), and the display column Wait Time Since Last Customer Update is called Customer Wait Time. Only the labels changed; the filter below behaves identically on either version.
Setup
Click Create Filter in the left navigation. Everything below happens on the Filter tab unless noted.
1. Name it and share it
- Filter Name: Escalation Dashboard
- Who else can view this → Permission group…, Support Managers
- Tick Display count in Workspace
2. Leave the top-level match on all
The line above the conditions reads Match [all] of the following conditions. Leave it on all: every line and every group below has to pass.
3. Add the three conditions that apply to every request
Every condition is added the same way — click the + icon (Add condition) below the condition box. A blank row appears with a dropdown on the left; choose the condition there, and fill in the controls that appear beside it.
- Open/Closed (under Request Details) → open
- Wait Time Since Last Customer Update (minutes) (under Date and Time) → Greater than → 120. This field is in minutes, not hours. The calculator icon beside the value box opens Calculate Minutes if you would rather work in hours and let HelpSpot convert.
- Last public reply from (under Other) → Customer. This is the condition that makes "waiting" mean waiting — see below.
4. Add the category group
A Category condition holds one category, so covering two of them takes a group.
- Click the + below the condition box to add a row.
- In its dropdown, scroll to the Advanced heading and choose ANY of the following are true. The row turns into a group header with its own + icon beside it, and one blank condition appears inside the group.
- Set that inner condition to Category → Is → Billing.
- Click the group's own + to add a second inner condition: Category → Is → Technical Support.
The two + icons do different things, and this is the step that trips people up: the one on the group header adds a condition inside the group; the one below the whole condition box adds another top-level condition. (Inner conditions are inserted directly under the group header, so a group can end up listing them in the reverse of the order you entered them. Inside an ANY group, that makes no difference to the result.)
5. Add the first exemption group
- + → Advanced → ANY of the following are true.
- Set the inner condition to Is urgent (under Request Details). It takes no operator and no value — choosing it is the whole condition.
- Group's + → Wait Time Since Last Customer Update (minutes) → Greater than → 480.
6. Add the second exemption group
- + → Advanced → ANY of the following are true.
- Set the inner condition to Is urgent.
- Group's + → Number of public updates (under Other) → Greater than → 1.
What you should end up with
Match all of the following conditions:
- Open/Closed → open
- Wait Time Since Last Customer Update (minutes) Greater than 120 — the 2-hour floor, applied to everything
- Last public reply from → Customer
- ANY of the following are true: Category Is Billing; Category Is Technical Support
- ANY of the following are true: Is urgent; Wait Time Since Last Customer Update (minutes) Greater than 480
- ANY of the following are true: Is urgent; Number of public updates Greater than 1
7. Preview it
Click Run Filter to check the conditions before saving. It shows the first 10 matches unless you tick Show all results first. Spot-check a few rows: every result should be open, in one of the two categories, waiting on a reply from you, and either urgent or well past both non-urgent thresholds.
8. Set the Options tab
- Columns To Display: Request ID, Customer, Email Subject, Category, Assigned To, Wait Time Since Last Customer Update, Last Public Staff Update, Public Update Count
- Order: Wait Time Since Last Customer Update, Descending
- Group Requests By: Category
- Tick Never cache the workspace display count
Then Save Filter.
Category and reporting tag names in this example are placeholders — substitute the ones your installation actually uses. The Last Public Staff Update column requires HelpSpot 5.8.5 or later; on earlier versions, leave it out.
Why "Last public reply from → Customer" is in there
It is doing two jobs, and the filter is wrong without it.
It enforces the "without a reply" half of the rule. The scenario asks for customers who have written more than once and not been answered. Nothing else in the filter says that.
It keeps the wait time honest. That condition only measures a live wait while the customer's message is the most recent thing on the request. If a staff member has replied since, it returns the gap between the customer's last message and that reply instead — a historical figure that never changes. So without this condition the dashboard would also list requests where the last exchange happened to be slow but nobody is waiting on anything now.
One rough edge remains, and it is worth knowing about: Number of public updates counts every public note, staff replies included, so it is a proxy for "the customer wrote more than once" rather than an exact count of customer messages. With Last public reply from in place it behaves correctly in the ordinary case. The exception is a staff-initiated request — staff wrote first, the customer replied once — which counts as two.
Why "Is urgent" appears twice
This is the part that looks like a mistake, and isn't.
Each of the last two groups is an exemption.
- "Either this request is urgent, or it has waited more than 8 hours."
- "Either this request is urgent, or the customer has written more than once."
An urgent request satisfies both groups just by being urgent, so neither extra requirement applies to it — it only has to clear the 2-hour floor at the top. A request that is not urgent fails the urgent half of both groups, so it has to satisfy the other half of each: more than 8 hours and more than one message.
There are two groups because there are two requirements to be excused from. If non-urgent requests had three extra requirements, there would be three groups, each starting with Is urgent. The repetition is doing real work: it is not the same condition entered twice, it is the same exemption applied to two different rules.
Why two waiting thresholds?
The other thing that looks like a duplicate: the filter asks for 2 hours at the top and 8 hours further down. If a request has already been caught by the 2-hour line, what is the 8-hour test adding?
Nothing after the first condition is catching anything. In a Match all filter every condition can only remove requests. The 8-hour group is not there to find requests — it is there to hold requests back.
Follow one through. A Billing request, not urgent, waiting 3 hours, customer has written twice:
- Open — passes
- Waited more than 2 hours — passes (180 minutes)
- Category is Billing — passes
- Either urgent, or waited more than 8 hours — fails. It is neither.
So it does not appear. Without that group it would land on the dashboard at the two-hour mark, which is not what the rule asks for: a request that is not urgent is not supposed to escalate until 8 hours. The same request at 9 hours passes the group and shows up.
The two thresholds are the limits for two different populations. 2 hours is what an urgent request has to clear; 8 hours is what a non-urgent one has to clear.
Then why is the 2-hour line at the top rather than in its own group?
Because anything that has cleared 8 hours has necessarily cleared 2. Stating the 2-hour requirement for everyone costs nothing on the non-urgent side, and it saves a fourth group. The strictly equivalent version — ANY of the following are true: Is Not urgent; Wait Time Since Last Customer Update (minutes) Greater than 120 — is more to read and returns exactly the same requests.
Why it has to be built this way
The natural way to write this rule is two branches — "urgent and waited 2 hours" OR "not urgent and waited 8 hours and wrote twice". That needs a group inside a group, and HelpSpot allows only one level of grouping. See Sub-Condition Groups.
You cannot merge the last two groups into one, either. That would mean putting "waited 8 hours and wrote twice" inside a single ANY group — another nested group, and equally not allowed.
If you would rather write the branches out literally
The same filter can be built the long way, with no exemption logic to follow. Set the top level to Match any and add four groups, one per combination:
- ALL: Open; Last public reply from Customer; Category Is Billing; Is urgent; wait > 120
- ALL: Open; Last public reply from Customer; Category Is Billing; Is Not urgent; wait > 480; public updates > 1
- ALL: Open; Last public reply from Customer; Category Is Technical Support; Is urgent; wait > 120
- ALL: Open; Last public reply from Customer; Category Is Technical Support; Is Not urgent; wait > 480; public updates > 1
Each group is one complete escalation case, which some people find easier to check. The cost is repetition: Open, the reply condition and the category appear in every group, and adding a third category means adding two more groups rather than one line. Both versions return exactly the same requests — pick whichever you would rather come back to in six months.
Why the rest of it works
Grouping by category shows whether escalations are concentrated in one team. Urgent requests appear at the top of each group by default. Never Cache keeps the count honest on a filter people are watching.
Last Public Staff Update tells the manager, per row, when your team last actually replied. Wait Time Since Last Customer Update measures from the customer's side; this column measures from yours, so a request that has never had a public staff reply shows a blank here and stands out immediately from one where the last answer simply didn't resolve things.
6.23. Example: Report on Tickets Opened or Worked On During a Month
Scenario
A monthly activity report usually needs two kinds of ticket: the ones opened during the month, and the ones opened earlier that were still being worked on during it. Those are two different date conditions, and the filter has to accept a ticket that satisfies either one.
Set Match to "any", not "all"
This is the step that catches people out. At the top of the filter editor is Match [all|any] of the following conditions. Left on all, a ticket has to have been opened in the month and updated during it — which returns only the month's new tickets, and makes it look as though the carry-forward half of the report simply isn't working. Set it to any. See How Filter Conditions Work.
Building the filter
- Click Create Filter in the left navigation. See Creating a Filter.
- Set the filter to Match any of the following conditions.
- Click the + icon (Add condition) below the condition box and choose Relative Date Since Opened (under Date and Time), set to Last Month. This catches everything opened during the month.
- Click + again and choose Request Updated, also set to Last Month. This catches older tickets that saw activity during the month, whenever they were opened.
- Click Run Filter to preview the results, then Save Filter.
A ticket that was both opened and updated during the month appears once, not twice.
Choosing the right update condition
Request Updated is the broadest of the three. It matches a request with any history entry inside the window — notes and updates, public or private, from staff, customers or automation rules. If your automations touch tickets on a schedule, those tickets appear in the report even though no person worked them.
Two narrower options:
- Request Publicly Updated — public notes only, whoever wrote them. Use this for "tickets someone actually corresponded on".
- Customer Updated Request — public notes written by the customer only, excluding their opening message. Staff replies and private notes do not match it. Use this for customer-driven activity.
All three ask whether any activity of that kind fell inside the window, not when the most recent activity happened. A ticket last touched in September still counts for August if something happened to it in August. See Filter Conditions Reference.
The month is relative, not fixed
Last Month recalculates every time the filter runs, so run it during September to get your August figures.
There are no fixed-date conditions for updates. Opened Before Date, Opened After Date, Closed Before Date and Closed After Date are the only date pickers in the condition list, and they only cover when a request was opened or closed. Reproducing an arbitrary past month needs the administrator-only Custom "where" clause (SQL) condition — see Custom SQL WHERE Clause in Filters.
Because of that, export the results each month rather than relying on the filter to reproduce an old month later. See Exporting Filter Results to CSV.
Narrowing it further
To add another constraint — a single category, say — the two date conditions have to stay OR'd together while the category is AND'd to them. That takes a sub-condition group:
- Leave the filter's own Match on all.
- Add a condition row and choose ANY of the following are true, under the Advanced heading in its dropdown.
- Put Relative Date Since Opened and Request Updated inside that group, using the group's own + icon.
- Add the Category condition alongside the group, not inside it.
See Sub-Condition Groups.
6.24. Example: Monitoring a New Staff Member's Activity
Scenario
A manager onboarding someone wants to watch all of their work — customer replies and internal notes — to give coaching feedback.
Why this works
Stream: Staff Only w/ Private is the one view that includes internal notes. "Stream: Customers and Staff" sounds like it covers more, but it is public-only and would hide exactly the coaching material you want.
Leaving out an Open/Closed condition means completed work stays in view, not just what is still open. Keeping the filter to Only me avoids the trainee seeing that they are being reviewed.
There is deliberately no date condition either, because the point is to see everything they have worked on rather than just today's requests. If the list grows unwieldy, add Relative Date Since Opened → Past 7 Days — bearing in mind that it filters on when the request was opened, not on when the trainee worked on it, so recent work on an older request will drop out of view.
Setup
On the Filter tab. The condition is added with the + icon (Add condition) below the condition box; it does not need a sub-condition group.
- Filter Name: Training — [Staff Name]
- Match all:
- Assigned to Is [Staff Name]
- Deliberately omit any Open/Closed condition, so closed requests stay visible
- Who else can view this → Only me
On the Options tab:
- Default Filter View → Stream: Staff Only w/ Private
Resulting logic
Assigned to = [Staff Name]
No Open/Closed condition, so closed requests are included too.
6.25. Example: Monitoring SLA Response Times
Scenario
The team must respond to equipment issues within 24 hours. The lead wants the requests at risk, oldest first.
Why this works
Sorting oldest-first with the count above the Inbox means the team sees the size of the backlog and can work down it in order.
The Show Urgent Requests: Inline step matters and is easy to miss. By default, HelpSpot pulls urgent requests to the top of every filter, which overrides your Order — so an "oldest first" queue is not actually oldest-first until you set this. Leave it At the top if you would rather urgency won.
Using Minutes since last update rather than a date condition means requests with any recent activity — including internal notes — drop out, keeping the filter to genuinely stalled work.
Setup
On the Filter tab. Each condition is added with the + icon (Add condition) below the condition box; none of them needs a sub-condition group.
- Filter Name: Equipment — Needs Response
- Match all of the following conditions:
- Open/Closed → open
- Category Is Equipment
- Reporting Tags → the Equipment / Issues pair
- Minutes since last update Greater than 1440 (24 hours)
- Tick Display count in Workspace
On the Options tab:
- Order: Last Update, Ascending
- Tick Display filter above Inbox in left navigation
- Set Show Urgent Requests to Inline
Category, status and reporting tag names in this example are placeholders — substitute the ones your installation actually uses.
Resulting logic
Open = Yes
AND Category = Equipment
AND Reporting Tag = Equipment / Issues
AND minutes since last update > 1440
6.26. Example: SLA Compliance Across Tiers
Scenario
Three support tiers with different first-response targets. Tier 1 (General Inquiries) 24 hours. Tier 2 (Technical Support and Billing) 8 business hours. Tier 3 (anything tagged Critical) 1 hour. The operations director wants to review how often each tier missed its target over the past month.
A note on names
This example uses the HelpSpot 5.8.5 condition labels. On 5.8.4 and earlier, First Response Speed All Hours (Minutes) is called Minutes since first response (all hours), and Wait Time Since Last Customer Update (minutes) is called Customer wait time (minutes). Only the labels changed — the measurements, and everything below, are the same on either version. The display columns used here keep their existing names.
Why this is an audit, not a live queue
The condition these filters are built on — First Response Speed All Hours (Minutes) — only matches requests that have already received a first staff reply. A request still sitting unanswered is excluded by design: the query drops rows with no response time, because otherwise every unanswered request would match every threshold.
That makes this a look-back report. It answers "which requests did we answer too slowly?", not "which requests are about to breach?"
For the live version — requests still waiting, before anyone has replied — use Wait Time Since Last Customer Update (minutes), paired with Last public reply from → Customer. On a request nobody has answered, that condition measures the time since the customer wrote, which is the first-response clock.
The pairing matters. Wait Time Since Last Customer Update only measures a live wait while the customer's message is the most recent thing on the request; if a staff member has replied since, it returns the gap between the customer's message and that reply instead — a historical figure that never changes. On its own it would also match requests nobody is waiting on. Example: Escalation Dashboard is built that way.
Why this is three filters, not one
Two product constraints decide the shape:
Condition groups cannot nest. Three tiers each with their own AND-ed rules, OR-ed together, needs two levels.
There is no business-hours condition. First Response Speed (biz hours) exists as a display column and a sort option, but not as something you can filter on. Tier 2's target cannot be selected for at all.
One filter per tier is clearer to read anyway, and it lets each tier keep its own target in its own name.
One thing to know before you start: reporting tags belong to categories
A reporting tag is not a free-floating label. Every tag is defined inside one category, and the condition takes a single Category / Tag pair. "Critical" under Technical Support and "Critical" under Billing are two different tags that happen to share a name.
So a tier defined by a tag — like Tier 3 here — needs one condition per category that has that tag, grouped together. This catches people out, because the tier sounds like one idea and the product needs it spelled out three times.
This example assumes a Critical tag exists in all three categories. Drop the pairs you do not have.
Setup
Create three filters, all sharing an SLA audit folder, all with Display count in Workspace ticked, and all with these display columns: Request ID, Customer, Email Subject, Category, Reporting Tags, Assigned To, First Response Speed (all hours), First Response Speed (biz hours), Date Opened.
Three things are the same across all three:
- Relative Date Since Opened → Past 30 Days keeps the report to a reviewable window. Without it, each filter accumulates every late response you have ever sent and the count stops meaning anything. Note the window is anchored on when the request was opened, not when it was answered — a request opened five weeks ago and answered last week falls outside it.
- No Open/Closed condition. A request that was answered late counts whether or not it is still open, and most of them will be closed.
SLA audit — Tier 1 late
Match all:
- Category Is General Inquiries
- Without reporting tags → General Inquiries / Critical
- Relative Date Since Opened → Past 30 Days
- First Response Speed All Hours (Minutes) Greater than 1440 (24 hours)
SLA audit — Tier 2 late
Match all:
- ANY of the following are true: Category Is Technical Support; Category Is Billing
- Without reporting tags → Technical Support / Critical
- Without reporting tags → Billing / Critical
- Relative Date Since Opened → Past 30 Days
- First Response Speed All Hours (Minutes) Greater than 480 (8 hours — but read the caveat below)
The two categories need a group because a Category condition holds one category. To build it: add a condition row with the + below the condition box, choose ANY of the following are true from under the Advanced heading in its dropdown, set the blank condition that appears inside to Category Is Technical Support, then use the group's own + to add Category Is Billing beside it. See Sub-Condition Groups.
The two Without reporting tags conditions stay at the top level. Each excludes its tag outright, and in a Match all filter that is exactly what you want — a request has to clear both.
SLA audit — Tier 3 late
Match all:
- ANY of the following are true: Reporting Tags → General Inquiries / Critical; Reporting Tags → Technical Support / Critical; Reporting Tags → Billing / Critical
- Relative Date Since Opened → Past 30 Days
- First Response Speed All Hours (Minutes) Greater than 60 (1 hour)
Built the same way as Tier 2's category group — one group, three conditions inside it, added with the group's own +. No category condition is needed here: the tag pairs already say which categories are in scope.
Order each by First Response Speed (all hours), Descending, so the worst misses are at the top.
Category, status and reporting tag names in this example are placeholders — substitute the ones your installation actually uses.
To review near misses alongside breaches, lower the threshold: 1080 on Tier 1 shows everything that used more than three quarters of the 24-hour target, and the First Response Speed column tells you which of those actually went over.
Resulting logic
Tier 1:  Category = General Inquiries
                   AND NOT tagged General Inquiries / Critical
                   AND opened in the past 30 days
                   AND minutes to first response > 1440

Tier 2:  (Category = Technical Support OR Category = Billing)
                   AND NOT tagged Technical Support / Critical
                   AND NOT tagged Billing / Critical
                   AND opened in the past 30 days
                   AND minutes to first response > 480

Tier 3:  (tagged General Inquiries / Critical
          OR tagged Technical Support / Critical
          OR tagged Billing / Critical)
                   AND opened in the past 30 days
                   AND minutes to first response > 60
In all three, "minutes to first response" exists only for requests that were answered, so unanswered requests appear in none of them.
Why the tiers exclude each other
Tier 3 cuts across categories, while Tiers 1 and 2 are defined by category. Without the Without reporting tags conditions, a Critical request in Billing answered in 90 minutes would count as a Tier 3 miss (over 60) and, later, could count again as a Tier 2 miss — appearing on two reports against two different targets, and inflating both counts.
The assumption being made: a Critical tag outranks the request's category tier. A Critical Billing request is judged against the 1-hour target, not the 8-hour one, so it belongs to Tier 3 and nowhere else. That is what the scenario implies, but it is a policy decision, not a product behavior — check it against how your own tiers are meant to work before copying this.
If your Critical tag is meant to be an additional flag rather than a tier of its own, leave the exclusions out and accept that the counts overlap.
The Tier 2 caveat
Tier 2's target is 8 business hours; this filter measures 8 calendar hours. Calendar time runs continuously, while a business-hours clock only advances while the team is working — so a request arriving at 5pm on Friday has piled up more than 60 calendar hours by Monday morning without using a single business hour, and crosses the filter's line before anyone could reasonably have answered it.
The error only runs one way: calendar time can overstate but never understate, so the filter cannot miss a real breach — it just includes some requests that were answered well inside their target. That is why First Response Speed (biz hours) is in the display columns. The filter finds the candidates; you read the column to see which ones genuinely missed. Treat the Tier 2 count as a shortlist, not a breach total.
7. The Request Page
7.1. Concept and Contents
The request page is the Customer email, portal form submission, or phoned-in inquiry translated into a request; it's the core of individual inquiry/request management. From here, Staff can reply to the Customer, add meta-data, categorize, and assign the request.
The request page is accessible only for those with a HelpSpot account. The primary ways Users will access the request page include:
- Clicking the Take It button from the Inbox
- Clicking the request ID from the request grid of any view
- Clicking Create a Request in the left navigation of the workspace
- From a link in an Update email
Navigating Requests within a Filtered View
When a filtered view (including inbox and workspace) has more than one request, Users can easily navigate between requests through the use of the next and previous buttons in the top right of the request page. This eliminates the need to go back to the workspace to enter the next request.
Request Page Layout
For the purposes of understanding functionality, the request page can be divided into 5 main areas.
- Customer Details
- Time Tracker (if enabled)
- Request Note
- Request History
- Request Details
7.2. Customer Details
For every request, HelpSpot provides fields for logging Customer-specific information.
HelpSpot will automatically populate as much information as possible for requests initiated via the portal form or an email. For requests manually entered by Staff, the Staff member must enter the Customer information as part of the request creation process.
History Search
Within the History Search tab, Users can see all open requests for that customer. Searches default to General, however it can be quickly adjust to search on such parameters as domain name or Customer ID. Upon clicking the Customer ID for any request, you see a preview of the request with the option to insert customer data in the current request.
Live Look Up
Live lookup allows HelpSpot to communicate with an external database (or other system that stores Customer data, pertinent to the support staff desk). Its power is it provides real-time display of data from external systems within HelpSpot, ensuring Customer information and custom field data is always accurate. For information on configuring Live Look Up, see the Administrators Manual.
7.3. Creating a Note: Formatting and Note Types
HelpSpot offers two formats for creating/sending updates via email: HTML (via visual editor or formatted text) or plain text.
HTML Formatting
HTML formatting can be done in one of two ways, via a visual editor or formatted text. Both provide the same end-result yet require Users to apply style in different ways.
Visual Editor (WYSIWYG)
HelpSpot defaults to sending/receiving HTML emails; so 'out of the box' Users will see a formatting tool bar across the top of the note box to support the sending of HTML emails. This tool bar functions similar to formatting tool bars in Microsoft Word. To format text, type in the box, highlight and click the desired formatting option.
Formatted Text
For installations with formatted text enabled, HelpSpot uses a formatting text mark-up to modify how text is displayed. Formatting covers the basics most Users would need for a note such as bolding, underlining, linking, and bulleted lists. HelpSpot converts the mark-up into HTML once the User submits the update. The Formatting Options link opens a window listing the characters that must be used to achieve the various formatting effects and serves as a reference when applying styles.
Note Types
As we review the note types, keep these key HelpSpot principles in mind:
- Customers receive email notices only when a public note is used.
- All note types are logged within the request history.
- The assigned Staff person receives an email when other Staff person updates the request.
- HelpSpot appends the request ID to every outgoing message for the logging replies in the request history.
Public Notes
These notes are used to provide the Customer an update on their inquiry. Public notes are:
- available to Customers via the portal, and
- are emailed to the Customer (via the email in the Customer information box).
Add Notifications and Modify Sending Settings
Notifications and sending settings are configured in the Email Options area. Click on the Email Options area to view these options.
Staff can be added to notifications through this menu or they can be tagged using the "@" hotkey in the request note editor.
Others, outside of the Customer or Users, can also receive a public note. Those individuals should be listed as a CC or BCC.
To add a recipient, click the Add a CC Email or Add a BCC Email, type the recipients email address and click Add.
When an email address is added, the recipient will continue to be included on all public updates until the address is removed. To remove the email address, simply click on the email icon next to the address.
As part of the public note options there are fields to modify the email subject and change the sent from email address. Users may find modifying the subject is an easy way for recipients that aren't familiar with the issue to understand the contents of the message they received.
Modifying the email subject doesn't mean you lose the interaction in HelpSpot. Because HelpSpot auto-appends the request ID to all subjects of outgoing emails, any responses will be correctly logged within the request history.
Private Note
Staff may want to make a note on an action they took toward addressing a request, such as: making a phone call or leaving a note to the assigned staff member. In such cases, the private note should be used. These notes are logged within the request history however, no email is sent to the Customer (nor is there an option to send the note via CC or BCC).
External Note
The external note capability allows Staff to work with the necessary resources while still having the entire interaction logged within the request history. Customers do not receive email updates when an external note is used; only the specified recipients will receive the message when an external note is created. The external note options are the same as the public note options (CC/BCC options).
7.4. Request Note Hotkey Autocomplete
There are several autocomplete hotkeys that can be activated in the note editor. After a hotkey is entered in the editor, continue to type the search term desired to bring up the menu of matching options.
| Hotkey | Action |
| @ | Allows staff members to be tagged by name in a request note. Tagged staff members will receive a notification. |
| # | Inserts responses by title. |
| $ | Inserts placeholder variables. |
The video below covers how to use each of these hotkey combinations.
7.5. Request History
Every action completed on a request is logged within the request history. Actions can range from a note to the Customer to the logging of request detail changes. Logging all interactions enables any User, at any time, to become current on the happenings within a Customer request.
Users also have the option to filter history by: Full History, Only Notes, Public Notes, or Files.
Individual Entries: Up-Close
While the actions that create the entry may vary, the basic look and feel of all entries remains the same.
HelpSpot includes the following in every entry type:
- Time/Date Stamp of action
- Clear label of entry type (ie: Public/Private/External Note or Event Log)
- User name and photo, if available, for all User-generated actions
- Message recipients, when applicable
- Message, when applicable
- Description of request detail change, when applicable
The request history item menu provides access for the following:
- Quote a previous entry in a new note
- Change note status to public or private (excluding system-generated entries)
- Convert an individual entry into it's own request
- Generate a direct link to this entry. Handy for sending to another User for quick review.
Each note in a request history can be pinned using the "pin" icon. Pinning causes the request note to always appear at the top of the request history.
Across all entry types, images attachment are embedded within the request history for ease of viewing. For all other file types, there will be a link for downloading.
7.6. Converting A History Item To A Request
Overview
Convert a history item into a separate request when the content of a history note or item needs to become its own request. Converting creates a new request and links it to the original history item so context is preserved.
When to convert a history item
- When a history note contains a new, distinct issue that should be tracked separately
- When you need a separate request for follow-up work or escalation
- When the history item should be visible as an independent request in the system
Steps to convert a history item to a request
- Open the request that contains the history item you want to convert.
- Find the specific history item.
- Click the three-dot menu on the history item.
- Select "Convert to Request" from the menu.
- A new request will be created and automatically linked to the original history item.
What happens after conversion
- A new request is created from the history item content.
- The new request is linked to the original request in the history so relationships are clear.
7.7. Request Details
The request details area contains the information necessary to manage the working of the request as well as the data to classify the request for reporting or automated processes.
Status
Users have the ability to assign a status to a request. A status assignment can reflect a milestone in the resolution process, including what led to the closure of the issue. For example, HelpSpot provides the following by default: active, problem solved, Customer found solution, Customer unreachable, and software bug. To close a request, Users must select a status type other than Active.
HelpSpot comes by default with a few status types to get Users started however; Administrators can customize the list of status types.
Category
On a very basic level, categories are used in HelpSpot to group-like requests together. This grouping can range from defining the nature of the inquiry to specifying the work group/department responsible for resolution. HelpSpot's flexibility allows organizations to best define the function that the category assignment serves.
It's important to keep in mind that beyond just a simple label, each category defines the types of meta-data collected for a request by tying request assignment, reporting tags, and custom fields directly to the category.
Appropriate category application, in conjunction with the meta-data collected, can provides help desks with a framework for workflow management.
Assigned To
Administrators must define the Users that have access to work requests within a specific category. Once this is done, Users will see on the request page a list of Staff to which a request can be assigned. This list will always contain:
- The default contact for the category,
- The Inbox as an assignment option. This means it will go to the Inbox and be available for anyone to take, and
- A count next to each Users name of how many requests are currently opened and assigned to them.
To select a Staff member, Users should use the dropdown to navigate available Staffers. Assignment is immediately applied as soon as the request is updated (via the Update Request or Update and Close buttons).
Assignment is the cornerstone of creating a request workflow. Once assignment is selected and submitted, the request will move to that User's My Queue and be flagged as unread for them to work.
Assignment can also be the basis for generating:
- Reports⎯monitor activity by User.
- Filtered Views⎯quickly navigate to requests based on assignment.
- Automation Rules⎯perform various actions based on request assignment.
Reporting Tags
Within each category an additional level of classification is available via the reporting tags. The selection of a value within the category drop-down will determine the reporting tags displayed.
Users can select as many reporting tags as applicable for the request by click the checkbox next to the tag. When the Update or Update and Close buttons are clicked, the tags will be applied to the request and logged within the request history.
At anytime reporting tags can be un-checked when no longer applicable.
Because HelpSpot ties reporting tags to the categories, when a category changes, any reporting tags selected under the previous category will no longer apply and new tags must be selected.
Reporting tags can be used to create:
- Reports⎯monitor requests by an additional level of classification.
- Filtered Views⎯quickly navigate to requests that contain specific reporting tags.
- Automation Rules⎯perform actions based on an additional level of classification within the request.
Custom Fields
Custom fields represent custom meta-data that can be collected for a request. There are 11 types of custom fields available to Administrators for creation. These data field types can be used in a various combinations to collect the information necessary for meeting specific business requirements.
In addition to showing custom fields on the request pages for Users, Administrators can also make selected fields available to Customers via the portal web form (note: not all are available in the portal). In these cases, a custom field that is populated by the Customer will be displayed to the User on the request page.
Custom field values are applied to the request as soon as the Update Request or Update and Close buttons are clicked. Custom field changes/updates are logged in the request history.
Uses for custom fields include:
- Reports⎯monitor requests by key indicators as defined by Administrators, not HelpSpot.
- Filtered Views⎯quickly navigate to requests that meet values specified in custom fields.
- Automation Rules⎯perform actions on requests based on organization-specific information.
Options
Within the header of the request details, there's an options menu that allows Users to:
- Set Reminders - Set a reminder specific to the request, using the reminders icon along the request details header. Reminders can include a note along with the inclusion of additional Staff. All reminders for the logged in User are in the user menu.
- Merge Requests - Combine one or more requests.
- View Access Key & Password - Customers must use the access to lookup a request on the portal. To access all their requests, at once, Customers must login using their email and password.
- Trash - Remove the request from the system; will no longer be included in filtered views or reporting.
- Print - Users can select to print a printer-friendly version of the request.
7.8. Urgent Flag
The Urgent flag helps prioritize time-sensitive requests. When a request is marked as urgent, it is highlighted and appears at the top of the default sorting in filters.
How the Urgent flag is applied
- Email-based requests: The Urgent flag is applied when the sender marks the email as urgent or high priority in their email client. The email includes an urgent or high-priority header, and the help desk interprets that header and applies the Urgent flag when the request is created.
- Manually in a request: The Urgent flag can be selected manually using the Mark Urgent button.
- Through Triggers or Automation Rules: Triggers and automation rules can mark requests as urgent as an action.
Manually mark a request as urgent
- Open the request.
- Select Mark Urgent.
8. Responses
8.1. Responses
Responses are predefined messages, available to Users when updating requests and/or responding to forum posts.
Responses can be created with stylized text (bolding, bulleted lists, etc.) and contain placeholder information, such as assigned Staff members' email addresses or request IDs. Additionally, specific actions can be tied to the use of a response (ie: changing categories, status, or assignment). As with the use of the response itself, the associated actions can be a huge time saver for Staff.
The page is broken out into a complete list of all active responses (click to edit each). Below the list is the form to add a response. Users will be required to define a name, location, and permission access for the response.
Formatting
Placeholders
{{ $requestid }} - Request ID
{{ $accesskey }} - Access Key
{{ $replyabove }} - "Reply Above" Text
{{ $portal_email }} - Portal Login Email
{{ $portal_password }} - Portal Login Password
{{ $customerfirst }} - Customer first name
{{ $customerlast }} - Customer last name
{{ $customerid }} - Customer ID
{{ $customeremail }} - Customer email
{{ $customerphone }} - Customer phone
{{ $status }} - Status
{{ $category }} - Category
{{ $urgent }} - Urgent
{{ $open_closed }} - Open/Closed
{{ $date_opened }} - Date Opened
{{ $date_now }} - Date Now (current date/time)
{{ $assigned_first }} - Assigned staff member: first name
{{ $assigned_last }} - Assigned staff member: last name
{{ $assigned_email }} - Assigned staff member: email
{{ $assigned_phone }} - Assigned staff member: phone
{{ $logged_in_first }} - Logged in staff member: first name
{{ $logged_in_last }} - Logged in staff member: last name
{{ $logged_in_email }} - Logged in staff member: email
{{ $logged_in_phone }} - Logged in staff member: phone
{{ $subject }} - Original mail subject line
{{ $initialrequest }} - Initial Request Note
{{ $orgname }} - Organization Name
{{ $helpdeskurl }} - Help Desk URL
{{ $requestformurl }} - Request Form URL
{{ $requestcheckurl }} - Request Check URL
{{ $knowledgebookurl }} - Knowledge Book URL
Request Actions
Users can expand the power of the response by defining specific actions to be taken on the request when responses are applied. Actions can range from updating a category or status to adding a private note. Any actions taken as a result of a request, will be logged within the request history.
Reoccurring Requests
Responses can be optionally turned into reoccurring (or recurring) requests that create new requests at a specified interval.
8.2. Response Permissions
Overview
HelpSpot Responses are predefined replies or templates that can be used to quickly address common inquiries or issues. This documentation covers the permissions and capabilities associated with editing and ownership of these responses.
Editing Permissions
Admins
- All Admins Can Edit All Responses: Administrators have the privilege to edit any response, regardless of who originally created or owns it.
Owners
- Editing Own Responses: Response owners, i.e., the users who originally created a particular response or has been assigned ownership, have the ability to edit that specific response. This allows them to make updates or corrections as needed.
Usable By
- Responses can be shared using the Usable By field. Responses that are shared with groups of users will be usable by that group. However only the Owner and Admins will be able to edit the response.
Ownership and Transfer
The owner of a response is the user who originally created it or the user to whom ownership has been transferred. There are two sets of users who can transfer ownership, the Current Owner or an Admin.
Transferring Ownership
-
By the Current Owner: The current owner of a response can transfer its ownership to another user. This might be done if the original owner is leaving a team or believes another user is better suited to maintain the response.
-
By an Admin: Administrators also have the capability to transfer the ownership of any response to another user. This can be useful in scenarios where the original owner is no longer available or if there's a restructuring of responsibilities.
Steps to Transfer Ownership
- Click on "Responses" from the main menu.
- Find and select the response you wish to edit.
- Scroll to the "Response Owner" field.
- Choose the new owner from the dropdown list.
- Click "Save" to confirm the changes.
9. HelpSpot AI
9.1. AI Composer Overview
The HelpSpot AI Composer helps your team draft accurate, consistent customer replies using ticket context and your knowledge base content. It is designed to speed up response times while keeping agents in control of every message.
How It Works
When you use the AI Composer, it:
- Reviews the current ticket conversation
- Pulls in relevant customer information
- References any linked knowledge base articles
- Follows your organization’s communication standards
- Applies the selected tone option (if chosen)
It then generates a complete draft reply for the agent to review. Nothing is ever sent automatically — all responses are saved as drafts until approved by your team.
Using the AI Composer
- Open a ticket.
- Enter a short instruction or prompt in the AI composer box (for example: “Tell the customer how to return the item.”)
- Optionally link one or more knowledge base articles.
- Generate the draft.
- Review, edit if needed, and send.
The AI Composer uses the linked knowledge base content to ensure replies are grounded in your official documentation.
Linking to KB Articles
Linking to KB articles provides the composer with additional context with which to draft its response. If you have a KB article available, it's always best to include it in the context.
Prebuilt Prompts
The AI Composer includes pre-built prompts allow agents to perform common tasks with one click. These are found in the prompts menu. Prebuilt prompts are managed centrally so your entire team works consistently. Read more about creating prompts here.
Composer Settings
The composer settings can be accessed via the gear icon in the composer:
Each agent can include custom instructions that the composer will follow:
- Always thank customers for contacting us on initial messages
- Include order numbers in replies when available
- Keep responses concise and solution-focused
Agents can also select preset tone options when generating a reply, such as:
- Efficient - Concise and plain
- Formal - Balanced and professional
- Friendly - Warm and helpful
These tone settings adjust how the draft is written while still following your organization’s standards.
Agent Review & Control
All AI-generated responses are saved as drafts.
Agents remain responsible for:
- Reviewing content
- Making edits
- Approving and sending messages
Best Practices
- Use clear, simple prompts.
- Link relevant knowledge base articles whenever possible.
- Review drafts before sending.
- Establish organization-wide communication guidelines for consistency.
9.2. AI Action Prompt Usage
HelpSpot AI action prompts allow you to perform AI tasks on text in the request note editor and in the knowledge book editor. These prompt may modify existing text or draft responses for you. The action prompts that are available in your system are determined by your HelpSpot Administrator.
Action prompts can be accessed in two different ways.
- Typing an exclamation point (!) immediately followed by part of the name of the action prompt will allow you to autocomplete and trigger the action:
- You can also browse the available action prompts from the Composer menu:
AI action prompts can be applied to all of the text in the editor or to a selection. If you want to apply an AI action prompt to a selection of text first select the text and then select the prompt from the menu. The {{ input.text }} placeholder will only include the text selection in this case.
9.3. AI Summarize Request History
The Summarize History feature appears directly below the AI Composer. It uses AI to generate a concise one-line summary for each public and private update in the request.
Summaries are displayed in reverse chronological order and include clickable timestamps that link directly to the update from which each summary was generated. This allows agents to quickly scan the conversation history and jump to specific updates for additional context.
Demonstration
History Retention
Generated summaries are cached for up to 7 days. If a new update is added to the request, the summaries will automatically be regenerated to reflect the updated conversation.
Configuration / Options
- Summaries are generated in the same language used in the initial request.
- This feature is not affected by agent-specific prompts, instructions, or style guidelines.
- All HelpSpot AI features must be enabled in the administrative AI Settings before they are available.
9.4. AI Request History Translation
When HelpSpot AI is enabled. Staff members can translate request history items using HelpSpot AI. The translation is temporary and the original text is always preserved in the database. To translate a request history item select the request history menu and then choose "Translate" from the menu.
The translation will be performed from any language to the language selected as the Translation Language in Admin > HelpSpot AI > AI Settings.
9.5. Generate KB Article from Request History
This feature allows an agent to transform a public response within a request into a structured knowledge base article ready for review and publication. Agents can generate an article from either a single response or the full request history. The system analyzes the selected content, generates a draft article, and saves it as a private (unpublished) draft directly in the Knowledge Base for further review and editing.
Demonstration
How It Works
The process begins with the  icon, which appears next to each public response in the request history:
Clicking the icon opens a prompt that collects the information required to generate the article:
- Article Title
The title that will be used for the generated knowledge base article. - Book
Select an existing KB Book where the article will be created. - Chapter
Select an existing KB Chapter within the selected KB Book. - Attachments
If applicable, choose which attachments from the request context should be included or excluded. - Context
Choose whether the article should be generated from a single response or the full request history. - Additional Guidance
Provide optional instructions to guide the generative process, similar to the AI Composer.
After clicking Generate, the system creates a draft article based on the selected context. The generated content can be reviewed and regenerated with additional guidance if needed. Once satisfied with the result, click Create Article to create the knowledge base entry.
Select Open KB Editor to open the newly generated article in the Knowledge Base, where it can be further edited and reviewed before publication.
Configuration / Options
- Articles are generated in the same language used in the response or request history.
- This feature is not affected by custom admin prompts, agent prompts, instructions, or style guidelines.
- All HelpSpot AI features must be enabled in the administrative AI Settings before they are available.
9.6. Editing AI Summaries
Generate Request Summaries
AI Request Summaries use HelpSpot AI to summarize what your customer has contacted you about and, once enabled, replaces the ‘Initial Request’ column in the Inbox & My Queue pages, along with any filters where you’ve added that column. This feature is turned on by default for new customers, and can be turned on or off by going to Admin, then HelpSpot AI, and then selecting AI Settings.
Editing Request Summaries
Request summaries can be edited for individual requests by accessing the "request meta" dialog inside of any request.
1. Click on the 3 dot menu.
2. Edit the summary and then choose "save".
10. Knowledge Books
10.1. Public vs. Private
Knowledge books allow an organization to create documentation for their products/services. Books are organized with chapters and pages, providing a familiar structure for ease of navigation.
Throughout this section reference will be made to public and private knowledge books, the differences are:
- Public. Intended for Customers. These knowledge books are available via the portal and through the KB area within HelpSpot (by Staff only).
- Private. Intended for Staff only. These knowledge books are accessible only via the KB area within HelpSpot.
10.2. Adding/Editing Books
Book Creation
Within the Knowledge area, books can be created via the Add a Book button.
During book creation, specify the book-level properties such as name, book editors and book type (public/private).
As soon as a public knowledge book is added it will be live on the portal. To prevent Customers from seeing partial books, select Yes to making your books private until you're ready to have them go live.
Ordering Books
Using the Books Order button, Users will be brought to a page to sort either the public or private books.
Editing & Deleting Books
All books (public and private) are listed on the left navigation. To edit any one of those books, click the title and use the edit book button within the book table of contents screen. The form to modify is the same as the one used to create the books. Keep in mind that when a book is deleted, all content within the book is deleted as well and cannot be recovered. When it's gone, it's gone!
10.3. Adding/Editing Chapters
Adding Chapters
Within the book table of contents page (accessible by clicking the left navigation), Users should use the Add Chapter button.
Chapters default to being visible (not hidden). Hiding chapters is useful when adding content to an existing, live book.
Chapters can be designated as an appendix, meaning they will appear at the end of the book without a chapter number.
Editing Chapters
Next to the chapter name on the book table of contents page is the edit chapter button. It is through this area the parameters of the chapter can be modified or a chapter can be deleted. Keep in mind that when a chapter is deleted it can not be recovered. When it's gone, it's gone!
10.4. Adding/Editing Pages
Adding Pages
Again, from the book table of contents page, Users should use the Add Page button located next to each chapter name to add a page within that chapter.
Adding pages is a two-step process. The first step requires naming and sorting order be selected. During the second step page content is created. Pages are defaulted to being hidden, viewable only to editors, for the purposes of creation. When you're ready to go live simply flip Hidden to No.
Editors can also link related pages, flag a page as highlighted or add an attachment file to complete the content of the page.
Formatting Pages
The built in visual editor, allows Editors to stylize and format the content without the hassle of hand coding the necessary web mark-up. Type the desired content into the text box, highlight, and select the desired action from the tool bar. Images can be drag and drop uploaded or copied and pasted into the editor.
HelpSpot AI
Leverage some of the AI Composer tooling to adjust and refine the article.
Knowledge Tags
Each page can have any number of knowledge tags associated with the page content. For more on how to set knowledge tags and how they work see the knowledge tag page, linked under related pages.
Editing & Deleting Pages
Clicking the chapter title, within the books table of contents, to get to the page content. The page editor is accessed through the edit page button. From here, pages content and properties can be edited. When pages are deleted all content will be lost and cannot be recovered. When it's gone, it's gone!
10.5. Knowledge Tags
Knowledge Tags allow Users to create a cross-resource base of knowledge. The advantage over traditional search is it's a much quicker, accurate way for readers to find specific content across knowledge book pages and forums.
Applying Tags
Knowledge Tags can be applied to by Users to any knowledge book page or forum topic; during or subsequent to creation. Users should take care to include every/all relevant tags as this will maximize the pertinent results returned.
Tagging consistence across content is critical. As Users type to add a tag, HelpSpot will show existing matching tags. You can opt to select the tag, if applicable, or continue to type the full tag.
Editing Tags
You can edit existing tags on a page by clicking on the tag.
Tags in the Portal
Your portal users can access Knowledge Tags in alpha order at the bottom of the homepage. Readers can click any tag to get a complete list of Knowledge Book pages with that tag. Notice the variation in size. The relative size of the tag name corresponds to the number of times it occurs within the content.
When Readers search within the portal, there's a section that will return the exact match Knowledge Tag (if such exists).
Advanced Search and Tags
Users can search within Knowledge Tags using the Advanced Search in HelpSpot. Tags can be search individual or combined for the desired results set.
11. Reports
11.1. Todayboard
Completely redesigned, HelpSpot's Reports area is a robust, graphical-rich way of monitoring your help desk.
Todayboard
The landing page for the Reports area is the Todayboard, which is 6 distinct reports to provide a high-level look at the activity of the help desk.
Today's Request
Broken down by each hour of the day, this report shows requests opened today (24 hour period) and also compares that to activity of that 1 week ago. Allowing Users to see request activity today, throughout the day, relative to the same day last week.
Number of Replies to Close
As the title would indicate, this report show how many public notes were submitted (per request) by Staff prior to closing.
First Response Speed (Biz hours)
The average and median for how long (in hours) until requests had a public note added by Staff. This is calculated within business hours (default is 8-5, local time).
Top Workloads Currently
Staff (3) with the most number of requests currently open.
Top Categories
Shows the top five categories to which requests are being assigned.
Interactions
An hourly look at request types, broken out by type: public by Staff, private by Staff, and Customer.
11.2. Canned Reports
HelpSpot includes built-in reports that allow Users to monitor various aspects of activity on the help desk. Reports are broken out in to 3 groups: Requests Over Time, Analysis, Portal, and Time Tracker.
Report Characteristics
While reports differ in the data pulled, all reports have the following characteristics in common:
- For quick use, every report has a graphical representation of the results set.
- Hovering over any data point on a graph will provide the specifics (ie: date, time, or count).
- All reports provide the data set in list format that can be quickly accessed through the Data tab. It is from here you can drill down to see individual requests, as desired.
- When applicable, the median and average values are provided.
- Unless otherwise stated, the default time period is two weeks.
- Any modified report can be saved for future use.
- Reports can be exported in .csv format for manipulation outside of HelpSpot.
Modification Available for All Reports
All reports allow for the following parameters to be set:
- Time/date ranges
- Filtering. Any report can have filtering parameters added to refine the results returned. Filtering conditions are discussed within each report where relevant.
Requests Over Time
Perhaps the best overall look at the activity of the help desk, this report is broken out within the Reports navigation.
Requests over Time shows a count of requests (those opened) each day over the course of a 2 week period.
Modifications available for this report:
- group results by: time period, aggregate time period (ie: day of week/month of year), request detail item, or custom field.
Comparison Matrix
The comparison matrix report provides two axis of data compared in a heat mapped matrix. The matrix report will allow you to quick spot trends and analyze segmented help desk data ways that were not previously possible.
Modifications available for this report:
- Both axis can be selected from a list of available fields.
Productivity Overview
The productivity report allows the user to view first response and closing speeds in time layers.
Modifications available for this report:
- group results by date
- calculate based on business hours or 24 hour period
- group results by date
- calculate based on business hours or 24 hour period
First Response Speed
Shows the number of hours taken for Staff to update requests with the first public note.
Modifications available for this report:
- group results by date
- calculate based on business hours or 24 hour period
- show speed rates by hours or minutes
First Assign Speed
Time it took to be assigned to Staff from first entering the system. This report is most applicable for those NOT using automation or mail rules for auto-assignment.
Modifications available for this report:
- group results by date
- calculate based on business hours or 24 hour period
- show speed rates by hours or minutes
Replies by Count
Number of public updates done by Staff. Commonly used to see how many Staff updates were necessary to close a request. When using for this purpose, be sure the Open/Closed filter is set to Closed (defaults to all).
Modifications available for this report:
- group by count (prevents excessive spread in x-axis)
Interactions over Time
Count of notes, broken out by type, based on note creation date.
Modifications available for this report:
- group results by date
- group results by author (HelpSpot User & Customer)
Resolution Speed
Time taken (in hours) for a request to be closed.
Modifications available for this report:
- group results by date/month/year
- calculate based on business hours or 24 hour period
- based on date open or closed
Searches/Few Results
List of search terms used by Customers, which yielded the fewest results. Note, this report does not have an accompanying graph.
Aggregate Searches
List of search terms using in Customer portal. Those used most frequently are listed first.
Response Usage
Count of most used responses. List includes response title (link to response), response creator, and usage count. Users can use filtering to find the most used responses with a specific category or status type.
Modifications available for this report:
- specify Staffer or all Users
Customer Activity
Count of those Customers with the most requests in the system (defaults to include both open & closed).
Modifications available for this report:
- select unique identifier (email, name, or customer ID)
- limit results returned
Time Tracker: Time Events
A list of all time events logged by Staff. The request ID listed in each event can be click to view the Request.
Modifications available for this report:
- group results by date/month/year
- group by individual Staff
11.3. Editing and Saving Reports
As discussed in previous pages, Users can further refine the results set (ie: modify the parameters) in a number of ways.
- Adjust time frame
- Group results (discussed in specific reports on previous page)
- Use of Filter conditions
Using Report Filters
There are numerous filter conditions that can be applied only, or in conjunction with other conditions, to define the exact information needed. The filter conditions available in Reports are the same as those used within the Filter creation process.
Saving Reports
Once you've created a report that is tailored to your needs, it can be saved for future use. Saved reports can be organized into folders and shared with other staff members.
11.4. Scheduled Reports
Scheduling Reports
Reports can be scheduled under the Save + Email tab of the report interface.
A scheduled report will be emailed to selected individuals on a given time period. When a report schedule is setup the time period for the report will be adjusted each time the report is run. You can also choose to include a CSV of the report data as an attachment.
To schedule a report:
- Check the "Email This Report" checkbox.
- You can optionally check the "Include CSV export in email" checkbox to have a CSV attached to the emails sent.
- Select your schedule frequency. This is when the report will be sent out.
- Select a date range for your report data. This is the date range that the report will be run against.
- Select the staff members or external email addresses you would like the report sent to.
11.5. Sample Reports
Below represents a few of the report modification that can be made to find specific information; those areas most commonly monitored by help desk administrators/managers. As mentioned previously, any report can be saved in the My Reports folder for future use.
Grouping by Category, Assigned User or Custom Field
Base report. Request Over Time.
Description. Users can quickly see requests over time based on category, assignment or any custom field by using the Grouping drop down, as shown below.
Implication. Insight into any of these areas will allow managers to make adjustments such as: increased portal documentation on a particular topic (addressing high categories), use of auto-assigment to better balance workload, or coordination with other departments.
Counting Open Requests by Category
Base report. Requests Over Time.
Description. A filter can group open requests under category headings, but it will not show a count beside each one. For a total per category, use the report instead:
- Go to Reports and open Requests Over Time.
- Under Filters, add the condition Open/Closed set to open.
- Set Grouping to Category.
- Set the From date back far enough to cover your oldest open request. The report counts requests by the date they were opened and defaults to the last two weeks, so an open request opened earlier than the From date will not be counted.
- Run the report, then open the Data tab for the count per category.
Implication. Save the report to rerun it any time, or export it to CSV. Because the report keys on the date opened, review the From date whenever old requests are still open.
Related articles: Canned Reports · Editing and Saving Reports · Scheduled Reports
Filtering by Customer
Base report. Request Over Time.
Description. Using the filtering conditions, Users can see requests submitted by a particular customer or customers meeting specific criteria within the Customer Information fields (ie: email domain or customer ID). Different from creating a Filter, this report will give you an aggregate snapshot over a defined period of time. Note: for this example, Customer email domain was used, in addition the results are being grouped by status and the time frame has been expanded.
Implication. Managers can use this to monitor service agreements or other contractual commitments.
How Many Replies to Close
Base report. Replies by Count.
Description. Find the aggregate of how many public notes occurred prior to an issue being closed. This type of report can be used as a gauge to determine how much work is required to resolve issues. Note: the filter condition of Open/Closed was set to Closed for this report.
Implication. Higher numbers within a particular category/reporting tag area or by select individuals could indicate a need for increased training or revision/creation of prepared responses.
12. Customer Portal
12.1. Homepage
The portal is the Customer-facing site for HelpSpot. It's designed to enable self-service and provide Customers with a centralize location for all support-related information/activities. From the portal Customers can:
- Use the web form to submit an inquiry,
- Check the status of an inquiry (or login to check status of multiple inquiries),
- Search and browse knowledge books to find solutions.
While this manual uses one of the available default portal styles, it's important to note that HelpSpot's portal is fully customized; allowing consistency with the look of any company's website/intranet.
HelpSpot can support multiple (secondary) portals. This is used when separate customer facing support areas are needed. Configuration is done through the Administration area of the installation.
Given portal functionality is consistent across primary and secondary portals, the balance of this chapter will focus on the use of one, the primary, portal only.
Lay of the Land
When Customers enter the portal they'll see three distinct areas on the homepage
- Header and Search. Allows Customers to search forums or knowledge books.
- The Left Navigation. Links for submitting/checking/updating requests as well as links to any knowledge books (if public).
- Center of page. Grouped lists of links to items that were highlighted by editors (knowledge books), flagged by readers as most helpful (knowledge books), and the knowledge tag cloud.
12.2. Knowledge Books and Forums
Knowledge Books
Public books are highlighted in four areas within the portal:
- The portal homepage lists the knowledge book pages editors highlighted during the creation process.
- On the portal homepage, those pages voted most helpful.
- The left navigation will list all public knowledge books.
- Searching can be done within knowledge books.
Once a knowledge book title has been clicked, readers are brought to the table of contents, which includes all live chapters/pages with editor-specified pages highlighted for the reader, if applicable.
Clicking on a page title will bring readers directly to the page content. Readers can vote on the helpfulness of a page. An aggregation of the most helpful pages from all public books is listed on the homepage.
12.3. Submitting and Checking Requests
Submitting a Request: the Request Form
Using the link on the left navigation, Users can submit a request.
By default HelpSpot requests a simple problem description. Administrators can change the request description boxes to a three areas: what I did, what I expected to happen, and what actually happened.
Some installations may create custom fields and/or categories that they wish to make public to enable request workflow or capture additional information directly from the Customer.
To help reduce SPAM, captcha can be turned on by administrators.
Check and Update Requests
Customers can use the Check on a Request link, within the left navigation, to check on and update requests. Customers must provide the request access key, which is provided by default in the emails Customers receive, to see a specific request.
For the quickest and easiest access to all their requests, Customers should login into the portal using their email address (one provided when submitting requests) and password. If the customer has never submitted a request they can create a new account.
Passwords can be retrieved via the forgot password link. Once logged in, Customers will see a list of all requests they have (opened and closed) as well as the option to change their password for future login.
Just below all public update entries and the initial request, Customers will find an open text field where additional updates.
12.4. Section 508
Section 508
Section 508 of the Rehabilitation Act (29 U.S.C. § 794d), as amended by the Workforce Investment Act of 1998 (P.L. 105-220) requires federal agencies to develop, procure, maintain and use information and communications technology (ICT) that is accessible to people with disabilities - regardless of whether or not they work for the federal government. The US Access Board established the Section 508 standards that implement the law and provides the requirements for accessibility. You can read more about it from the official section508.gov website.
The public-facing portal of HelpSpot is fully 508 compliant, we use a tool called WAVE that is developed by WebAIM. This tool creates a report showing any errors with the code markup, any contrast errors, and more. You can see the results from running this on the portal home page as we have below:
The HelpSpot portal is also fully customizable and you can modify and change every part of it to not only match your brand but also address any regulations you need to meet.
The customer portal is the area of HelpSpot that your customers use to submit requests and view your documentation. Being fully 508 compliant ensure that all your customers are able to reliable access the portal.
HelpSpot Agent Interface
The HelpSpot agent interface is the 'app' part of HelpSpot where your support agents can manage incoming requests. This area is much more technically complicated and is only partially 508 compliant at this time, though it's an area we continue to improve each release.
This part of HelpSpot is only used by agents of the system, end customers never access this area.
Appendix: Feature In-Depths
1. Filters in Use: Working Example
Filters are a way to view create custom views of the requests. By default, HelpSpot ships with global 'All Open' and 'Recently Closed' filters. However, an infinitely combination of conditions can be combined to create a filter that meets your excact business need.
Here are 3 real world examples of Filters in use. Execution of these filters can vary, with additional conditions being layered on to meet the business need, but the following shown here is intended to give Users an idea of how each would be created.
1. Monitoring Contractual Commitments
Business Need: Support desk has a contractually agreement with Customer group (internal or external) to always respond to equipment issues within 24 hours of Customer updates.
Creation: Filter must be created to see those requests that haven't been updated within 24 hours, that has been assigned to Category: Equipment/Reporting Tag: Issues.
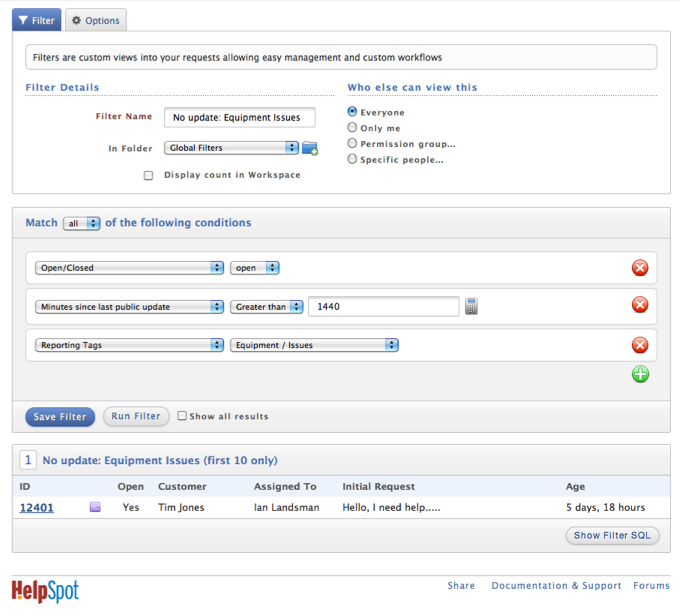
2. Creating Custom Inbox
Business Need: Create an Inbox for only those Staff working Account inquiries. Allows those Users to focus on working only those requests within their area of expertise.
Creation: Filter must be created to see those requests assigned to the Account Inquires category.
Unique to this filter is:
- selection of Staff that can access the filter
- addition of Take It button (not shown below but found under the Options tab).
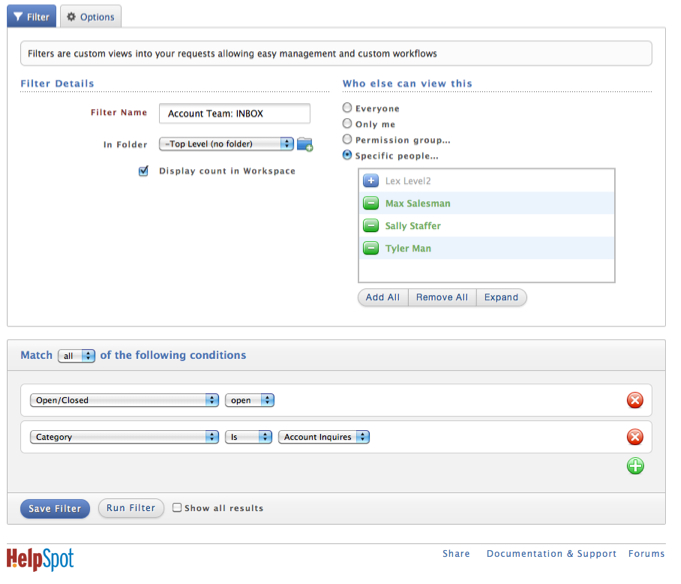
3. Monitor Activity of Selected Staff (Training)
Business Need: Monitor activity of selected Staff. Effective in providing timely feedback during training periods.
Creation: Filter must be created to see those requests opened Today, assigned to Staffer X, and are either currently Open or Closed.
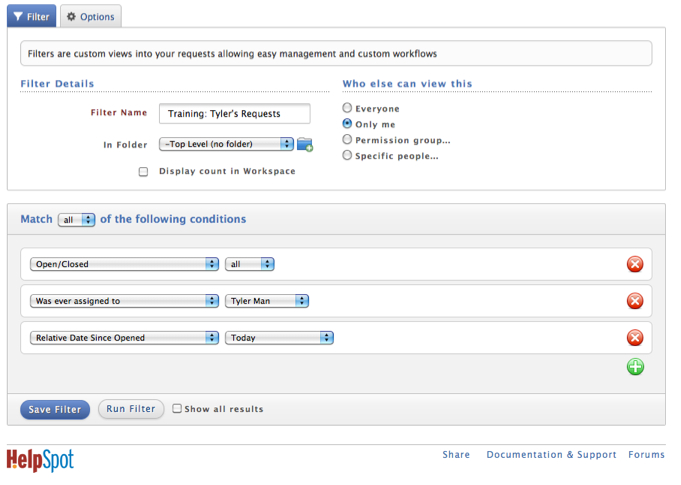
2. Merging Requests
The request merging feature forces the request history of one request into another. This is often used when multiple requests are created for the same Customer regarding the same inquiry.
Merging can be done from the:
- request grid view, via the quick action buttons, or
- within the request page, from the Merge link within the options menu.
Once the merge is complete, the User will be brought to the request page for the receiving request. The individual request histories of the merged request are inserted in chronological order within the receiving request. All merged histories are clearly identified, allowing you to retain an accurate account of all interactions.
Any responses to the original request are automatically routed to the newly created, merged, request.
Note: It is not possible to 'unmerge' once your requests have been merged together, so make sure you're certain you want to merge!
3. User Preferences
Once an account is created, each User has the ability to set/edit preferences by click their name in the top right corner of the screen.
The preferences page covers everything from password changes to signature creation and allows Users to personalize their HelpSpot experience.
Make sure you hit Save at the bottom of the page to ensure all changes are applied.
Email and Password
The name, email, and password are displayed, at the top of the preference page, to the User as entered by the administrator during account creation. Users have the ability to update this information.
The email address listed here for Users is the default address HelpSpot uses for sending notifications.
Black Box Username
This is only required for Users in installations that are running alternative authentication with an external source (such as Active Directory).
Photo/Icon
Users can select from an emoji library or opt to upload their own photo. The selected photo is used as part of the request history when the User creates an update, serving as a quick means to identify individual Users.
Users should resize images to 32x32 (pixels) prior to uploading to achieve the best results.
API Key Creation
Users can create an manage their api keys for interacting with other applications.
Communication
The communication area defines alternative contact information, out of office manager, as well as signatures for outgoing messages.
Alternative Contact Information
HelpSpot provides Users with a means for providing an alternative email, phone number, and SMS number. Options in the notification area allow Users to configure when messages/updates are sent via these alternative channels.
Out of Office Manager
Applies to: HelpSpot Cloud and self-hosted · staff preferences, request assignment
If a User is going to be out of the office for an extended period — vacation, medical leave, or similar — they can mark themselves out of office so their requests are routed elsewhere while they're away.
All Users default to Available. Using the drop-down, a User can change their status and choose where their requests should go. There are two kinds of destination:
- Inbox — requests go to the shared Inbox as unassigned, for whoever picks them up next.
- A specific staff member — requests are assigned to that person.
Once out of office is set, the destination applies both to new requests that would have been assigned to the User and to updates on requests already assigned to them.
What to expect: forwarding is triggered by any update to the request. It does not distinguish between a customer reply, a staff member editing a field, and a colleague adding a private note — all of them route the request to the chosen destination. There is currently no setting to limit forwarding to customer or public updates only.
A visual indicator of out of office status appears in the assignment drop-down on the request page.
Related articles: Inbox & My Queue · Defining Triggers - Conditions
Creating a Signature
Similar to any mail client, Users can create a signature block that is appended to every outgoing message/update (public and external notes).
HelpSpot offers both a text and HTML signature format to account for varying system configurations. As such, it is recommended that Users complete both text and HTML to ensure the signature is included.
When creating the HTML version of the signature, Users must use formatted text mark-up.
There's a third tab within the signature creation area for creating a mobile-specific signature. This signature will be used only when a User creates a note using HelpSpot mobile. Often a varying signature is used to inform the reader the note was created on a mobile device.
Notification
The notification area allows Users to configure where and under what conditions they receive a notification. The list below outlines each of the notifications options.
- Send notification via email. Checked by default, so any system notification and request updates will generate an email.
- Alternative email notification. Unchecked by default, this option sends all notifications to the alternative email address.
- SMS notification options. HelpSpot allows Users to send all notification (that would typically go to an email account) to an SMS enabled device. Users can opt to select to send all notifications or only urgent ones. All SMS options are uncheck by default.
- Notification for unassigned new requests. User can opt to receive a notification for every unassigned request that enters HelpSpot. The notification method will follow the channel specified within the options described above. This is unchecked by default.
General Preferences
These general preferences help Users personalize their experience by defining specific aspects of the look and feel to match their personal work style.
- Default to public note. Selecting this will default the note type to public each time the User enters the request page.
- Disable WYSIWYG in the knowledge books. For Users that prefer to hand code HMTL they can opt to disable the visual editor (aka: WYSIWYG editor) for knowledge book creation.
- Do not embed images in request history. Selecting this option will treat images as other attachments and create a link at the bottom of the request history entry containing the image. By default, this is not enabled and all images are embedded within the request history entry.
- Return to request after closing. By default, when a User closes a request HelpSpot will return the User to the filtered view they were in prior to entering a request. Selecting this option will bring Users to a request summary page once a request is closed. Enabling this option will give Users an opportunity to double-check a request after closing but before moving to the next request.
- Show Getting Started Menu in Workspace. By default, HelpSpot will show all Administrators the Getting Started menu as a quick reference. This can be turned off, or on for other permission levels, simply by checking the box.
- Number of request history entries shown by default. Users can enter the desired number of request notes seen within the request history. HelpSpot defaults to showing 10 request history entries.
Regardless of the number set in the preference, Users can see all request history entries simply by clicking the Show All link at the bottom of the request history list on the request page.
- Default Request History View. Users can specify if they wish to see Full Histories or Only Notes for every request they view.
- HTML editor for HTML notes. For systems with HTML notes enabled (system default), Users can opt to create HTML notes via the visual editor, formatted text, or use the system default (which could be either method; system default is the visual editor). Use of either the visual editor or formatted text will result in an HTML email being generated. HelpSpot defaults Users to the system default: the note creation method as defined by the Administrator.
4. Batch Response/Edit
HelpSpot gives Users that ability to batch response/update requests. Meaning, from in the request grid view (Workspace) Users can select a group of requests and initiate a response to be sent or an update to be made in the request details without entering the request page for each, individually.
Batch responding is understood through a real world example: Within a 20-minute period a support desk receives dozens of requests about connectivity issues that is determined to stem from a server outage. Using Batch Response/Edit, Users can send a message to all applicable requests explaining the situation while also updating the status, category/assignment, or reporting tags.
For later follow-up, such as sending sending status update notification, Users can opt to have a link to the results added as a filtered view on the left navigation.
5. Time Tracker
For installations with this enabled, the time tracker will be across the top of the request page. It allows each User to log the time spent on a request. Time tracking is primarily used by organizations for billing/customer contract purposes.
Time can be entered manually or through the use of the stop-clock. When manually entering time, decimal or standard time format (for example: 2.5 or 2:30) is accepted in the hours/minutes box. When using the stop-clock, click the arrow when work starts on the request and click it again when work is complete. The time lapsed will be logged for the entry. A field is provided to provide a brief description of the work completed during that logged session.
HelpSpot includes a Billable checkbox, allowing Users to flag time which would be billable for later reporting.
Users can also use the options menu to log time for another User, if necessary, as shown below. If time is logged without selecting from the options area, the time will be attributed to the logged-in User.
Once Users click the Log Time button the time will be listed as part of the aggregate time spent on the request.
To report time logged across all requests, use the Reports area.
6. HelpSpot Mobile App
HelpSpot Mobile is available on both the Google PlayTM and the iOS App Store. The Helpspot mobile app provides a streamlined mobile user interface for interacting with the HelpSpot application. The HelpSpot app will work on both self-hosted and HelpSpot Cloud instances.

Getting Started With The Mobile App
Since the mobile app connects to your instance of helpspot you will need the URL of your helpspot site the first time you login to the mobile app.
- Open the mobile app
- Enter the URL to your helpspot instance. For example: https://helpspot.yourdomain.com
- Enter your username and password
If you encounter issues logging in. Visit our troubleshooting guide.
Android, Google Play and the Google Play logo are trademarks of Google Inc.
Apple and the Apple logo are trademarks of Apple Inc., registered in the U.S. and other countries. App Store is a service mark of Apple Inc.
7. Need Help?!
If you need assistance with HelpSpot, there are several support-related resources available to you.
Knowledge Base and Community Resources
For detailed information on setting up and optimizing HelpSpot, visit our Knowledge Books at https://support.helpspot.com/. These resources are designed to provide in-depth information and troubleshooting guides for common issues.
Submitting Requests for Assistance
If you're unable to find the answer to your question in our knowledge base, you can submit a request for assistance via the request submission form at https://support.helpspot.com/index.php?pg=request.
Email Support
You can also email your questions or inquiries to our support team at customer.service@userscape.com. We'll do our best to respond promptly and provide a solution to your issue.
In most cases, using these resources will help you resolve your issue quickly and efficiently. If you're unable to find the help you need, don't hesitate to reach out to our support team for assistance.